Gomm Studios   (385) 392-7989
Gomm Stained Glass
  • Home
    • Fun Quiz Page
  • Projects
  • Classes
    • Learn More About Studio Classes
  • STORE
    • Art 4 Sale
    • Amazon Shop >
      • Store-Books
      • Store-Videos
      • Store-MiscProductsWeUse
      • Store-VideoandAudio
      • Store-StainedGlassSupplies
    • Etsy
    • Tips Articles >
      • Fixing Windows >
        • Repairing Severe Damage
        • Repairing A Broken Piece Of Glass
        • Fixing A Small Break In A Big Piece Of Glass
        • Faking A Repair
        • Doing A MAJOR Repair
        • How To Repair A Leaded Panel
        • How To Repair Stained Glass That Has Separated
        • How To Rebuild A Leaded Glass Window W/ Copper Foil
        • How To Repair A Moderately Broken Art Glass Panel
        • How To Repair An Insulated Stained Glass Window
        • Changing the Border Glass In a Leaded Panel
        • Repairing A Stained Glass Panel For An Artist
        • Repair Using A Dremel Tool
        • Quick(er) Lead Repair
      • Tricks Of The Trade >
        • Insulating Glass So It Can Be Hung In A Door
        • Moving And Handling Glass
        • Cutting Diamonds On Very Rough Glass
        • How To Add Coining To A Panel For A Very "French" Look
        • How To Shorten A Stained Glass Panel
        • How To Trim And Cut A Stained Glass Panel That's Too Long
        • How To Build A Jig To Help Cut Bevels
        • How To Cut Stained Glass Without A Pattern
      • Reinforcing and Framing Glass >
        • Reinforcing A Large Panel
        • How To Aggressively Reinforce A Window
        • Soldering A Zinc Edge On A Panel
        • How To Solder A Reinforcing Edge On A Curved Panel
        • How To Put Metal Around An Octagon Shaped Panel
        • Building A Frame For Stained Glass Shutters
      • Shipping Stained Glass >
        • How To Ship Big Stained Glass Panels
        • How To Build A Solid Shipping Crate
        • How We Crate Same Size Multiples of Glass
        • How To Build A "Double Foam" Crate
        • Loading Glass On A Trailer
      • Lighting Projects >
        • Installing Art Glass In A Pool Table Lamp
        • How To Build A Panel For A Backlit Space
        • How To Reinforce A Stained Glass Skylight
        • Creating A False Skylight
        • Building A Four Sided Lamp
        • Repair A Cheap Lamp Shade
        • Building A Stained Glass Lamp With A Worden Mold
      • Installing Stained Glass >
        • How To Install Stained Glass in an Existing Window Frame
        • How To Install Stained Glass In A Cabinet Door
        • How To Hang A Stained Glass Window
        • How We Install A Panel In An Arched Window Opening
        • What Ttype Of Caulk To Use
      • Sandblasting Stained Glass >
        • How To Sandblast Stained Glass
        • How We Sand Carve A Stained Glass Transom
        • Setting Up A Sandblast System
        • How To Sand Carve A Rose In Glass
      • Organizing Your Studio >
        • Build Your Own Work Bench
        • Chemicals We Use In Our Studio
        • Getting A New Glass Order
        • Build Your Own Stained Glass Rack
        • Converting To A Lead Free Studio
      • Bring New Life To Windows >
        • Removing Corrosion From Stained Glass
        • Re-Apply Patina To Stained Glass
        • How To Clean A Really Dirty Window
        • Clean And Apply Patina To Stained Glass
        • Cleaning And Adding Patina To A New Stained Glass Panel (revisited)
        • Easily Clean Corrosion Off Of Stained Glass
      • Unusual Projects >
        • Building A Stained Glass Globe
        • The Painted Leaf Project
        • How To Paint A Face On Stained Glass
        • Fusing A Stained Glass Necklace
        • Building A Stained Glass Picture Frame
        • Building A Stained Glass Jewelry Box
        • Make Stained Glass Charms
        • Repairing A Stained Glass Angel By Making Our Own Glass
      • Soldering Techniques >
        • Fix or Reinforce Glass With A Solder Bridge
        • How To Solder For A Stained Glass Repair
        • Reclaiming Old Flux Core Solder For Use In Stained Glass
        • Soldering Technique-Fixing A Foil Problem
      • Basic Skills >
        • How To Cut Stained Glass
        • How To Cut Stained Glass with a T-square Cutter
        • How To Cut A Tight Curve In Stained Glass
        • Cutting Very Thin, Irregular Stained Glass Pieces
        • Cut Glass Using A Straight Edge
      • Advanced Craftsmanship Skills >
        • Cut Glass Using A Taurus Ring Saw
        • Drill Holes In Stained Glass With Diamond Drillbit
        • Drill Holes In Stained Glass With A Grinder
      • Business Tips >
        • Marketing Stained Glass
        • Helping Your Stained Glass Business (And Yourself) Survive With Style
        • Mistakes Happen To Us All (And Then We Fix Them)
        • Converting To A Lead Free Studio
    • Training Videos & Books >
      • Gomm Studios Portfolio 1
      • Stained Glass Mandalas For Meditation
      • Stained Glass Mandalas For Success
      • Beginning Stained Glass
      • Stars, Stars and More Stars
      • How To Install Stained Glass
      • Stained Glass Picture Frame
      • Stained Glass Jewelry Box
      • Stained Glass Kaleidoscope
      • Stained Glass Charms
      • Stained Glass Projects For The Whole Family
      • Stained Glass Fan Lamps and Night Lights >
        • Fan Lamp Class Extras
      • Stained Glass Seasonal Quilt Blocks
      • Stained Glass Desk Sets
      • Stained Glass Stars
      • "Blinders" David's SF Novel
    • Videos
    • Patterns
    • Greeting Cards
  • About Us
    • Instagram
    • Shows And Galleries
    • History Of Our Studio
    • Articles About Us
    • Links
    • Contact Us
  • Patreon
  • 5 Ways To Thrive
Picture

Glass Tips & Tricks 

Newsletters from our past converted to fresh articles about stained glass.
Picture

Repairing A Broken Piece Of Glass


Here's the video version of this article

Picture
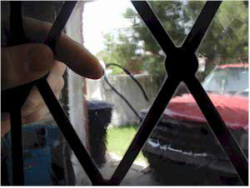
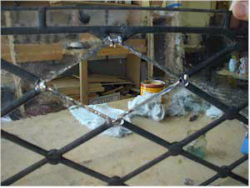
Here is a scratch or the start of a break. It might have been caused by excess heat or a flaw in the glass. It's been circled with pen so you can see it more readily. 

Picture
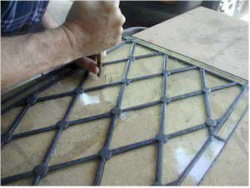
To replace the piece, we start by scoring the piece to be replaced many times. First one direction, 

Picture
and then the other.


Picture
Then I tap from the bottom to loosen the pieces of glass. Notice that I place a garbage can below the repair to catch the debris and save myself some clean up.

Picture
I continue to tap until several pieces of glass are ready to pop out. I don't want to be too aggressive at this stage because I don't want to create pressure against the surrounding pieces of glass, or they might break.

Picture
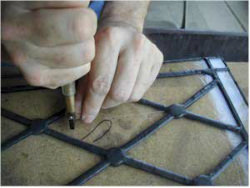
Now I heat up a soldering iron and begin to heat the old joint, melting the solder and allowing it to drip into the garbage below. I usually flux the area needed to be melted just to encourage the solder to melt more readily. I try to direct more heat onto the side of the joint that I'm replacing to reduce the likelihood of breaking the neighboring pieces of glass.


Picture
After I melt as much of the solder away as I can, I flip the panel over and melt the other side the same way. (See the ball of solder resting on an adjoining piece of glass, that could create a hot spot and break the glass, so avoid that condition).

Picture
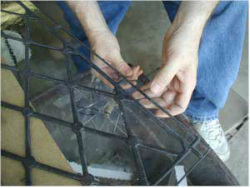
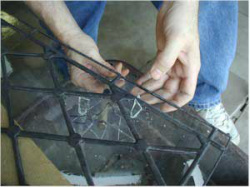
Now that most of the solder is removed and only copper foil is left to hold the pieces in the window, I begin to gently break and remove the pieces. I use great care not to damage the foil any more than necessary because if I don't damage the foil on the adjoining pieces, I can reuse it and save myself some work.  

Picture
Once all the pieces of glass are removed, I grip the unwanted foil that encased the removed piece of glass with pliers. Pulling gently on the foil at all times, I work the soldering iron around the entire piece, allowing the old solder to melt and release the unwanted foil from the surrounding foil.

Picture
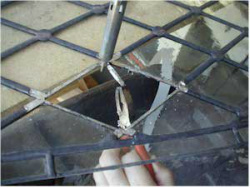
When I'm done, I have a pretty clean opening. If any of the foil is damaged, I clean the area and replace it. If this is an art glass piece you may need to create a pattern piece by placing poster board or paper under the opening and tracing it. Then cut out new glass as you normally would.


Picture
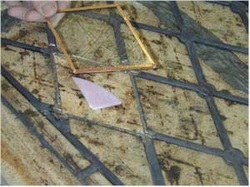
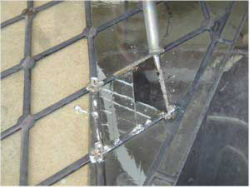
Now I set the new piece of glass in place. See the small piece of pink glass in the center, that's to keep the new piece of glass at the same height as the rest of the panel. (You can use any color of glass as a shim!)

Picture
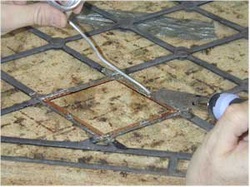
With the glass in place, I'm ready to flux and solder.

Picture
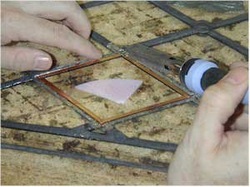
I touch the iron to a place where the pieces line up perfectly and lightly tack them. Then I can rock the other side gently until it lines up perfectly. I do this just often enough to get the piece in place and lined up with the surrounding pieces.

Picture
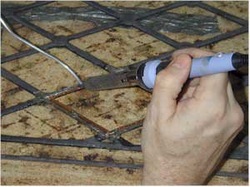
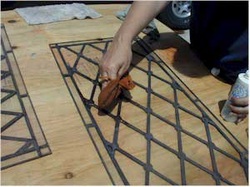
Once the new piece is tacked in place, I remove the shim to keep it from creating unwanted pressure points. Now I solder the replacement piece back in place. I keep my iron at a lower heat setting and quickly span the air gap with melted solder. After I have the gap filled, I don't have to be as careful with the extra heat, because the solder won't be as easy to run through to the other side. (When the gap is so large that solder runs through, I will fill the gap with an extra piece of copper foil.)

Picture
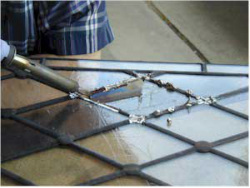
Then I flip the window over and solder the other side.

Picture
Here, Jeanne cleans the window and dries it thoroughly, then applies a fresh coating of patina.  And it looks as good as new!


Home

​
Stained Glass Books
​

Stained Glass Videos

​Links Page

Stained Glass
Art Therapy

​Studio Classes

OnLine Classes

​Portfolio

​Etsy Patterns

​UCAB Sourcebook

Build Your Own Table

Tips & Articles

Patterns

​Contact Us

Art For Sale

​Free Videos

Creativity Quotes​

Date Night
​
​
History Of Our Studio

​Articles About Us

​Shows And Galleries

​Join Our Email List

5 Ways To Thrive
​​

Copyright © 2016-2017