

|
Glass Tips & TricksNewsletters from our past converted to fresh articles about stained glass.
|

|
Make Stained Glass Charms
To read about the video we sell about making charms, click here.
To see the promo clip for our video on Youtube click here.
To see the promo clip for our video on Youtube click here.
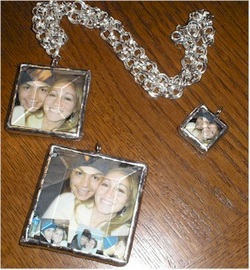
Jeanne has found that if she takes the pictures from a wedding announcement, she can make one or several charms from them and they make a wonderful, unique gift for the bride which will be cherished.
Charms are versatile and personal. Charm bracelets have been around for years and very collectible, but these new stained glass charms are even more tailored to the wearer than mass produced charms.
Charms are versatile and personal. Charm bracelets have been around for years and very collectible, but these new stained glass charms are even more tailored to the wearer than mass produced charms.
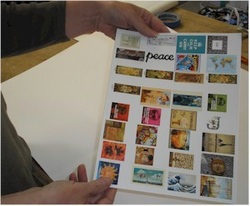
First, pick pictures that will make nice charms. You can use family photos, original painting prints or even original original art.
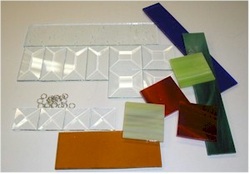
Then decide which size of glass you want for the charms. Jeanne will often pick colored glass for the back of a charm. Sometimes she uses beveled glass and sometimes she cuts clear glass to size.
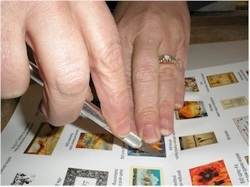
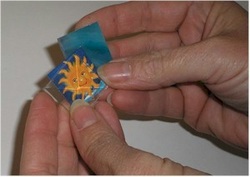
Lay the glass for the charm on top of the picture you desire for the piece and trace it. Then cut the picture out.
(Jeanne is using a bevel as a guide to cut around with a craft knife)
(Jeanne is using a bevel as a guide to cut around with a craft knife)
Place the cut picture (or pictures if both sides are clear) between the pieces of glass.
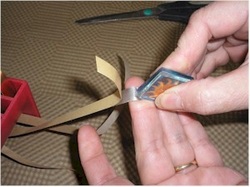
Wrap the assembly with copper foil. The foil should hold the pieces together and make it water tight. We like to wrap our charms with thick enough foil to allow at least 1/16" to fold over on each side of the charm. We often find that 5/16" or even 3/8" foil works well.
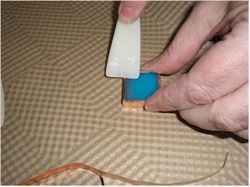
Burnish the foil so it's tight against the glass. You want it to be as tight as possible to prevent water or flux from seeping into the charm.
Next, brush flux around the edge of the charm to prepare it for soldering. Use it sparingly, avoiding soaking the charm. You want to get flux on the foil but you don't want it to get under the foil and risk it seeping in between the glass pieces.
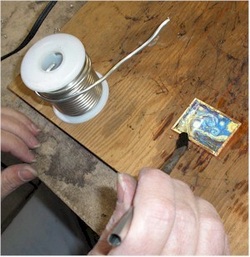
You'll want to use lead free solder when you complete the charm. Lead solder would be dangerous to wear next to the skin and lead poisoning could occur.
You'll want to use lead free solder when you complete the charm. Lead solder would be dangerous to wear next to the skin and lead poisoning could occur.

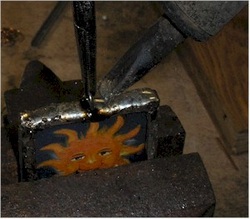
Solder the top of the charm, flip it over and
solder the back of the charm.
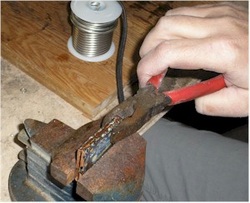
We find it helpful to use pliers to pick up the charm when placing it in a vise. The glass stays hot for a time and the charm is covered in flux which we want to avoid touching.
We only tighten the vise so that it holds the charm and really has little or no pressure on the glass.
Hobby stores carry jewelry vises which will work to hold your charms while you hold them. The one we use is an old vise that we've had for years and used for many purposes.
We only tighten the vise so that it holds the charm and really has little or no pressure on the glass.
Hobby stores carry jewelry vises which will work to hold your charms while you hold them. The one we use is an old vise that we've had for years and used for many purposes.
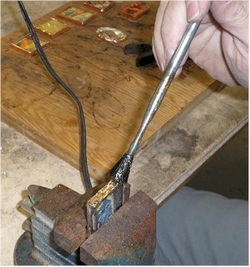
Brush the side to be soldered with flux again. The lead-free solder doesn't flow as easily as solder that contains lead, so careful attention to flux and soldering is important.
Using a hot iron helps, so we usually apply the first coating of solder with the iron as hot as possible.
Using a hot iron helps, so we usually apply the first coating of solder with the iron as hot as possible.
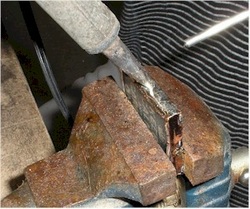
Start at one side of the charm and placing a bead at a time, work from one end of the charm to the other.
You'll find that sometimes the solder flows well and other times there will be gaps and flaws in the solder. When flaws occur, continue on to the other edge of the charm and then go back and touch up those spots where there are flaws.
You'll find that sometimes the solder flows well and other times there will be gaps and flaws in the solder. When flaws occur, continue on to the other edge of the charm and then go back and touch up those spots where there are flaws.
Once the solder is well distributed along the charm, you may wish to drag the iron tip along the charm edge in a smooth stroke to get a perfect edge.
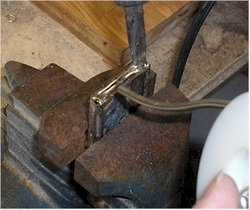
After all edges are complete, you'll want to attach a ring to the top of the charm. Grip the ring solidly so it won't slip as you solder it, with the split in the ring down so it will get sealed.
Align it so it's directly in the middle of the charm and touch the solder right next to the ring with the soldering iron tip and pull the iron away.
Align it so it's directly in the middle of the charm and touch the solder right next to the ring with the soldering iron tip and pull the iron away.
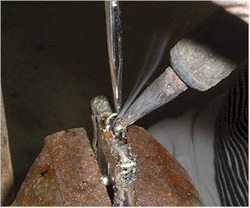
Touch the other side of the ring so that solder flows onto that side as well.
You may find that you need to do a finish pass with the iron, starting at the ring and dragging through the solder to get a perfectly smooth edge.
You may find that you need to do a finish pass with the iron, starting at the ring and dragging through the solder to get a perfectly smooth edge.
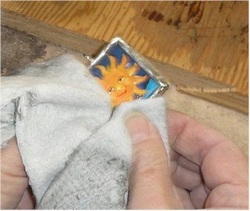
Then, polish your charm with a dry rag so you can see it well.
You can find Never-Dull polish on the internet for around ten dollars a can and it works well for polishing charms that are to remain silver.
You can find Never-Dull polish on the internet for around ten dollars a can and it works well for polishing charms that are to remain silver.
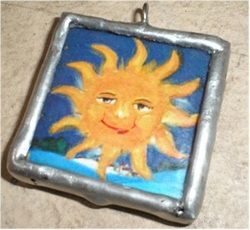
Here's a cleaned but not polished charm. There is a flaw in the lower right corner where a pin hole is left in the solder. We'll touch that with an iron and fill that gap. We'll also need to touch the upper right and upper left to fill those slight gaps. We'll also place the charm back in the vise and drag the iron across the bottom of the charm to smooth out the little bump on the bottom.
It takes a lot of practice to create perfect charms. I personally find it so frustrating that I let Jeanne solder them, she has more patience than I do.
It takes a lot of practice to create perfect charms. I personally find it so frustrating that I let Jeanne solder them, she has more patience than I do.
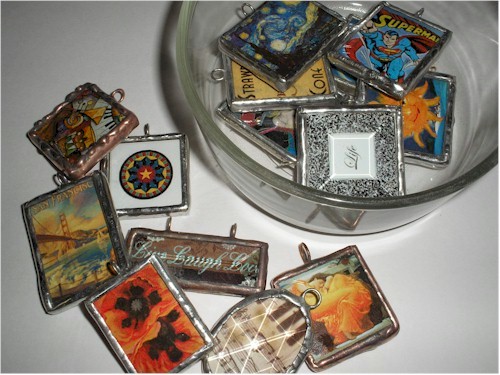
There are so many uses for charms. Each one can be as unique as a snowflake or you can make many of the same kind. They can stand out from each other or unify the team or the club. The possibilities and uses of charms are also varied. Your imagination is the only limit.