Gomm Studios   (385) 392-7989
Gomm Stained Glass
  • Home
    • Fun Quiz Page
  • Projects
  • Classes
    • Learn More About Studio Classes
  • STORE
    • Art 4 Sale
    • Amazon Shop >
      • Store-Books
      • Store-Videos
      • Store-MiscProductsWeUse
      • Store-VideoandAudio
      • Store-StainedGlassSupplies
    • Etsy
    • Tips Articles >
      • Fixing Windows >
        • Repairing Severe Damage
        • Repairing A Broken Piece Of Glass
        • Fixing A Small Break In A Big Piece Of Glass
        • Faking A Repair
        • Doing A MAJOR Repair
        • How To Repair A Leaded Panel
        • How To Repair Stained Glass That Has Separated
        • How To Rebuild A Leaded Glass Window W/ Copper Foil
        • How To Repair A Moderately Broken Art Glass Panel
        • How To Repair An Insulated Stained Glass Window
        • Changing the Border Glass In a Leaded Panel
        • Repairing A Stained Glass Panel For An Artist
        • Repair Using A Dremel Tool
        • Quick(er) Lead Repair
      • Tricks Of The Trade >
        • Insulating Glass So It Can Be Hung In A Door
        • Moving And Handling Glass
        • Cutting Diamonds On Very Rough Glass
        • How To Add Coining To A Panel For A Very "French" Look
        • How To Shorten A Stained Glass Panel
        • How To Trim And Cut A Stained Glass Panel That's Too Long
        • How To Build A Jig To Help Cut Bevels
        • How To Cut Stained Glass Without A Pattern
      • Reinforcing and Framing Glass >
        • Reinforcing A Large Panel
        • How To Aggressively Reinforce A Window
        • Soldering A Zinc Edge On A Panel
        • How To Solder A Reinforcing Edge On A Curved Panel
        • How To Put Metal Around An Octagon Shaped Panel
        • Building A Frame For Stained Glass Shutters
      • Shipping Stained Glass >
        • How To Ship Big Stained Glass Panels
        • How To Build A Solid Shipping Crate
        • How We Crate Same Size Multiples of Glass
        • How To Build A "Double Foam" Crate
        • Loading Glass On A Trailer
      • Lighting Projects >
        • Installing Art Glass In A Pool Table Lamp
        • How To Build A Panel For A Backlit Space
        • How To Reinforce A Stained Glass Skylight
        • Creating A False Skylight
        • Building A Four Sided Lamp
        • Repair A Cheap Lamp Shade
        • Building A Stained Glass Lamp With A Worden Mold
      • Installing Stained Glass >
        • How To Install Stained Glass in an Existing Window Frame
        • How To Install Stained Glass In A Cabinet Door
        • How To Hang A Stained Glass Window
        • How We Install A Panel In An Arched Window Opening
        • What Ttype Of Caulk To Use
      • Sandblasting Stained Glass >
        • How To Sandblast Stained Glass
        • How We Sand Carve A Stained Glass Transom
        • Setting Up A Sandblast System
        • How To Sand Carve A Rose In Glass
      • Organizing Your Studio >
        • Build Your Own Work Bench
        • Chemicals We Use In Our Studio
        • Getting A New Glass Order
        • Build Your Own Stained Glass Rack
        • Converting To A Lead Free Studio
      • Bring New Life To Windows >
        • Removing Corrosion From Stained Glass
        • Re-Apply Patina To Stained Glass
        • How To Clean A Really Dirty Window
        • Clean And Apply Patina To Stained Glass
        • Cleaning And Adding Patina To A New Stained Glass Panel (revisited)
        • Easily Clean Corrosion Off Of Stained Glass
      • Unusual Projects >
        • Building A Stained Glass Globe
        • The Painted Leaf Project
        • How To Paint A Face On Stained Glass
        • Fusing A Stained Glass Necklace
        • Building A Stained Glass Picture Frame
        • Building A Stained Glass Jewelry Box
        • Make Stained Glass Charms
        • Repairing A Stained Glass Angel By Making Our Own Glass
      • Soldering Techniques >
        • Fix or Reinforce Glass With A Solder Bridge
        • How To Solder For A Stained Glass Repair
        • Reclaiming Old Flux Core Solder For Use In Stained Glass
        • Soldering Technique-Fixing A Foil Problem
      • Basic Skills >
        • How To Cut Stained Glass
        • How To Cut Stained Glass with a T-square Cutter
        • How To Cut A Tight Curve In Stained Glass
        • Cutting Very Thin, Irregular Stained Glass Pieces
        • Cut Glass Using A Straight Edge
      • Advanced Craftsmanship Skills >
        • Cut Glass Using A Taurus Ring Saw
        • Drill Holes In Stained Glass With Diamond Drillbit
        • Drill Holes In Stained Glass With A Grinder
      • Business Tips >
        • Marketing Stained Glass
        • Helping Your Stained Glass Business (And Yourself) Survive With Style
        • Mistakes Happen To Us All (And Then We Fix Them)
        • Converting To A Lead Free Studio
    • Training Videos & Books >
      • Gomm Studios Portfolio 1
      • Stained Glass Mandalas For Meditation
      • Stained Glass Mandalas For Success
      • Beginning Stained Glass
      • Stars, Stars and More Stars
      • How To Install Stained Glass
      • Stained Glass Picture Frame
      • Stained Glass Jewelry Box
      • Stained Glass Kaleidoscope
      • Stained Glass Charms
      • Stained Glass Projects For The Whole Family
      • Stained Glass Fan Lamps and Night Lights >
        • Fan Lamp Class Extras
      • Stained Glass Seasonal Quilt Blocks
      • Stained Glass Desk Sets
      • Stained Glass Stars
      • "Blinders" David's SF Novel
    • Videos
    • Patterns
    • Greeting Cards
  • About Us
    • Instagram
    • Shows And Galleries
    • History Of Our Studio
    • Articles About Us
    • Links
    • Contact Us
  • Patreon
  • 5 Ways To Thrive
Picture

Glass Tips & Tricks 

Newsletters from our past converted to fresh articles about stained glass.
Picture

How To Add Coining To A Panel For A Very "French" Look

When we work with Candace, a designer of note in Salt Lake City, she loves to have us build windows with "French" diamonds.  In another article we showed how to cut the glass in that diamond pattern efficiently. Now we'll show how to achieve the coining look that really makes this glass style pop.
Picture
Before we show how to do it right, we have to show our first attempt. In this window, we cut the glass leaving spaces, which we filled with solder, to simulate the coined look. The results just weren't good enough. Some spots were the size of dimes, others the size of quarters. It looked okay, but it just wasn't good enough. We had to abandon 2 weeks work and start over. 

*Note how bad the corrosion is on this panel. It was never cleaned after soldering.


Picture
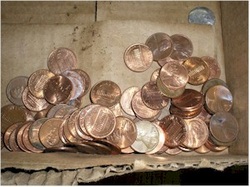
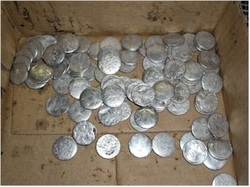
To get really good "coining" we reasoned that we were going to have to actually apply real coins. So we started with pennies, after all they would only cost a penny each!


(When we need bigger coins, we get sheet copper (they sell 12 x 12 sheets) and cut out rounds. We tried a scrapbooking punch which worked great till it got dull very quickly. So we used a circle template and placed it over the copper and ran a pencil around it 30 times which wore it out and allowed us to pull the circle out.)

Picture
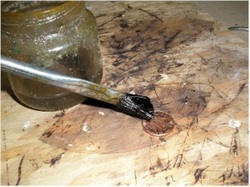
As you start by tinning the pennies (applying a thin coat of solder to them), you'll find that you need to use a strong flux. We used the strongest we have in the studio. There's a lot of corrosion on old pennies.

Picture
When soldering, first solder one side by heating the penny and allowing a little solder to melt unto the surface. You'll want to try to coat the surface of the coin evenly. (Gravity will assist you in doing this, but the corrosion on the penny will make it a challenge to get the solder to stick.

Picture
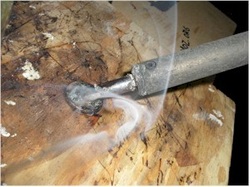
You'll want to use a pair of pliers to turn the coin over to solder the backside. The melted solder will start to ooze out from the bottom of the coin and this will help cover the edges of the coin with solder.

Picture
Once you have enough coins for both sides of the window, you'll want to wash off the gunk created when tinning them. It would be difficult to clean the back of the coin when it's applied to the glass.

Picture
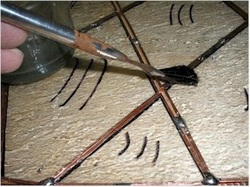
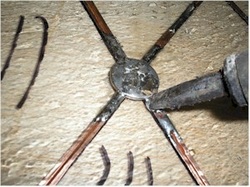
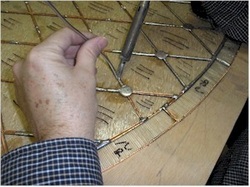
Coins will be applied to all intersections of the diamonds where there's room for them. So start by tacking the entire window together. You'll notice that instead of tacking the glass at the intersections, like normal, we choose to tack the glass away from the joints. This allows an easier install of the coin. We've tried it both ways, this way is faster and easier.

Picture
Now, you can lay the coin down and center it over the intersecting lines.

Picture
Hold the iron directly on top of the coin and allow the solder to melt under the coin. You'll see it melt on top and then you'll see a little bit of solder run out onto the copper below the coin. The only trick here is to apply even pressure so the coin doesn't start to slide around.

Picture
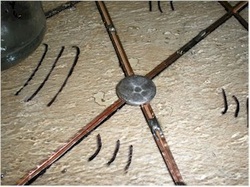
Next, create a bead of solder up each of the lead lines that go under the coin. 

Picture
Bring the solder right up onto the coin.

Picture
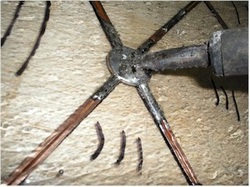
Then heat the whole top of the coin so that everything is smooth. You may have to rejoin the lead lines to the coin if too much solder runs under the coin and creates an "undercut" next to the coin.

Picture
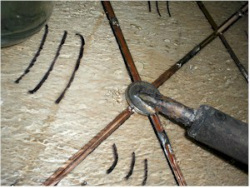
Continue on, soldering a coin at each joint. When you turn the panel over, simply line up each coin so that it's directly over the coin on the bottom of the panel.

Picture
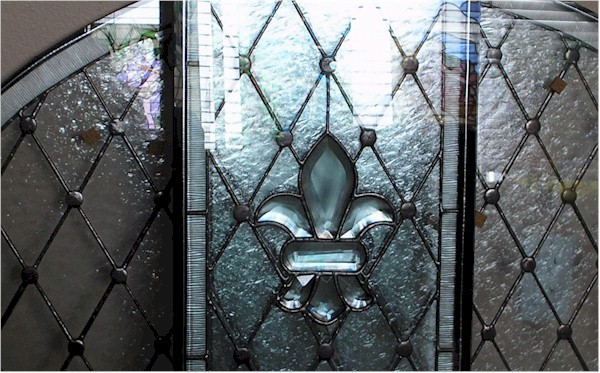
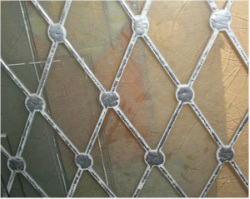
Here are the insulated panels, ready to be installed. You know the job's a success because they look like ancient, old world windows that have been rebuilt.

Home

​
Stained Glass Books
​

Stained Glass Videos

​Links Page

Stained Glass
Art Therapy

​Studio Classes

OnLine Classes

​Portfolio

​Etsy Patterns

​UCAB Sourcebook

Build Your Own Table

Tips & Articles

Patterns

​Contact Us

Art For Sale

​Free Videos

Creativity Quotes​

Date Night
​
​
History Of Our Studio

​Articles About Us

​Shows And Galleries

​Join Our Email List

5 Ways To Thrive
​​

Copyright © 2016-2017