Gomm Studios   (385) 392-7989
Gomm Stained Glass
  • Home
  • Projects
  • Classes
    • Learn More About Studio Classes
  • STORE & RESOURCES
    • Art 4 Sale
    • Amazon Shop
    • Etsy
    • Tips Articles >
      • Fixing Windows >
        • Repairing Severe Damage
        • Repairing A Broken Piece Of Glass
        • Fixing A Small Break In A Big Piece Of Glass
        • Faking A Repair
        • Doing A MAJOR Repair
        • How To Repair A Leaded Panel
        • How To Repair Stained Glass That Has Separated
        • How To Rebuild A Leaded Glass Window W/ Copper Foil
        • How To Repair A Moderately Broken Art Glass Panel
        • How To Repair An Insulated Stained Glass Window
        • Changing the Border Glass In a Leaded Panel
        • Repairing A Stained Glass Panel For An Artist
        • Repair Using A Dremel Tool
        • Quick(er) Lead Repair
      • Tricks Of The Trade >
        • Insulating Glass So It Can Be Hung In A Door
        • Moving And Handling Glass
        • Cutting Diamonds On Very Rough Glass
        • How To Add Coining To A Panel For A Very "French" Look
        • How To Shorten A Stained Glass Panel
        • How To Trim And Cut A Stained Glass Panel That's Too Long
        • How To Build A Jig To Help Cut Bevels
        • How To Cut Stained Glass Without A Pattern
      • Reinforcing and Framing Glass >
        • Reinforcing A Large Panel
        • How To Aggressively Reinforce A Window
        • Soldering A Zinc Edge On A Panel
        • How To Solder A Reinforcing Edge On A Curved Panel
        • How To Put Metal Around An Octagon Shaped Panel
        • Building A Frame For Stained Glass Shutters
      • Shipping Stained Glass >
        • How To Ship Big Stained Glass Panels
        • How To Build A Solid Shipping Crate
        • How We Crate Same Size Multiples of Glass
        • How To Build A "Double Foam" Crate
        • Loading Glass On A Trailer
      • Lighting Projects >
        • Installing Art Glass In A Pool Table Lamp
        • How To Build A Panel For A Backlit Space
        • How To Reinforce A Stained Glass Skylight
        • Creating A False Skylight
        • Building A Four Sided Lamp
        • Repair A Cheap Lamp Shade
        • Building A Stained Glass Lamp With A Worden Mold
      • Installing Stained Glass >
        • How To Install Stained Glass in an Existing Window Frame
        • How To Install Stained Glass In A Cabinet Door
        • How To Hang A Stained Glass Window
        • How We Install A Panel In An Arched Window Opening
        • What Ttype Of Caulk To Use
      • Sandblasting Stained Glass >
        • How To Sandblast Stained Glass
        • How We Sand Carve A Stained Glass Transom
        • Setting Up A Sandblast System
        • How To Sand Carve A Rose In Glass
      • Organizing Your Studio >
        • Build Your Own Work Bench
        • Chemicals We Use In Our Studio
        • Getting A New Glass Order
        • Build Your Own Stained Glass Rack
        • Converting To A Lead Free Studio
      • Bring New Life To Windows >
        • Removing Corrosion From Stained Glass
        • Re-Apply Patina To Stained Glass
        • How To Clean A Really Dirty Window
        • Clean And Apply Patina To Stained Glass
        • Cleaning And Adding Patina To A New Stained Glass Panel (revisited)
        • Easily Clean Corrosion Off Of Stained Glass
      • Unusual Projects >
        • Building A Stained Glass Globe
        • The Painted Leaf Project
        • How To Paint A Face On Stained Glass
        • Fusing A Stained Glass Necklace
        • Building A Stained Glass Picture Frame
        • Building A Stained Glass Jewelry Box
        • Make Stained Glass Charms
        • Repairing A Stained Glass Angel By Making Our Own Glass
      • Soldering Techniques >
        • Fix or Reinforce Glass With A Solder Bridge
        • How To Solder For A Stained Glass Repair
        • Reclaiming Old Flux Core Solder For Use In Stained Glass
        • Soldering Technique-Fixing A Foil Problem
      • Basic Skills >
        • How To Cut Stained Glass
        • How To Cut Stained Glass with a T-square Cutter
        • How To Cut A Tight Curve In Stained Glass
        • Cutting Very Thin, Irregular Stained Glass Pieces
        • Cut Glass Using A Straight Edge
      • Advanced Craftsmanship Skills >
        • Cut Glass Using A Taurus Ring Saw
        • Drill Holes In Stained Glass With Diamond Drillbit
        • Drill Holes In Stained Glass With A Grinder
      • Business Tips >
        • Marketing Stained Glass
        • Helping Your Stained Glass Business (And Yourself) Survive With Style
        • Mistakes Happen To Us All (And Then We Fix Them)
        • Converting To A Lead Free Studio
    • YouTube Videos
    • Free Patterns
  • About Us
    • Instagram
    • Shows And Galleries
    • History Of Our Studio
    • Articles About Us
    • Links
    • Contact Us
Picture

Glass Tips & Tricks 

Newsletters from our past converted to fresh articles about stained glass.
Picture

Installing Art Glass In A Pool Table Lamp

We had a metalworking artist build a framework for a pool table lamp. It was a little tricky but not difficult to install the glass. We don't electrify lamps, because that would require U.L. listings and the costs for custom work would be prohibitive. What we do instead is call the lamp a "lamp shade" and allow local electricians to install whatever light package they desire. We sell the plans for our pool table lamp on ETSY (click here). You can take the plans to a welder you trust and have them build one for you.

​Cut out poster board blanks that will fit into your frame and then build your glass to size. You don't want the glass too tight. It needs room to wiggle and have silicone all around the glass so it never makes contact with the metal.

Note: The long pieces go in first, they will cause the side pieces to have about 1/4" or more less room to go into the frame since the long side pieces will take up at least 1/8" on each side.
Picture
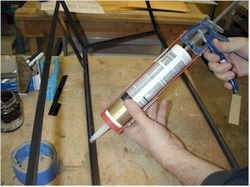
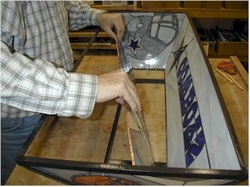
The panels are all built and sized to fit into the metal frame that I had built for the pool table lamp. After dry fitting each piece to make sure they would fit, I put a small bead of clear silicone caulk around the inside of the angle iron.

Picture
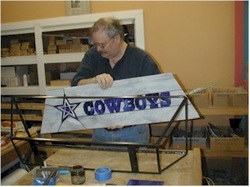
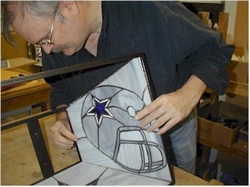
I have to gently ease the panel in place without allowing it to fold over since there are weaknesses in the glass design where the lead lines provide no support and depend on the frame they are going in for support.

Picture
Once it's inside the frame, I gently lay it in place and center the gaps to be equal on each side. I'm careful not to let the glass hit the metal edges of the frame and chip. 

Picture
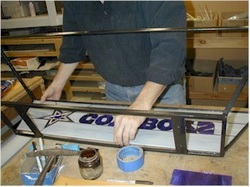
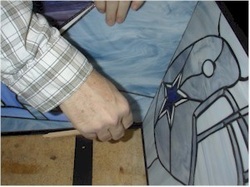
I then apply silicon to the inside of the side panel frame and ease the first side panel in place.

Picture
Same thing with the other side panel, add silicone and ease the panel in place. I have to be very careful not to allow too much pressure between the glass pieces. I even cut and grind some of the pieces so that the fit doesn't have too much pressure.

Picture
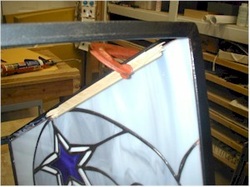
I take little strips of wood and c clamps to keep the glass tight against the frame, but I'm careful to only apply very gentle pressure. I don't want to crack my glass.

Picture
I let the framework sit for 24 hours so that the silicone can set and cure properly.

Picture
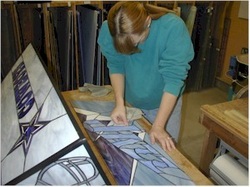
Here, Jeanne has just applied the black patina to the final panel and cleaned, waxed and polished it. 

Picture
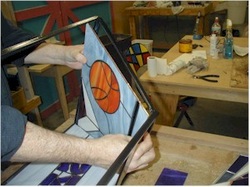
I stand the frame so gravity will work in my favor, remove extra sticks that were being used to clamp the panels and ease the final panel in place. I have to get the widest edge into the framework first and the pull the panel up into place so that the whole thing fits perfectly. I do it without silicone first so that I am sure it fits and then I bed it into the silicone.

Picture
At each corner, I make sure there isn't any pressure against the glass and I add a bead of silicone between the panels to fill the slight gap between them. I make sure there is a little space between them because I don't want the glass edges to touch. If they do, heat expansion could cause them to expand and break each other. Silicone will protect against breakage.

Picture
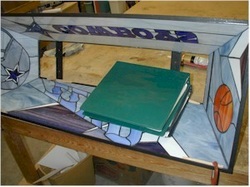
I put sticks and clamps against the final piece to hold it in place and I gently place a book on the panel to hold it against the frame where I can't easily get a clamp to fit. Once the silicone sets the glass fits well into the lamp and it's done.

Picture
Picture
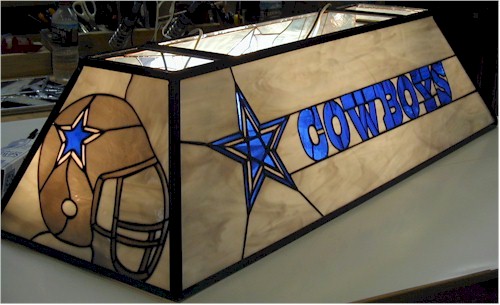
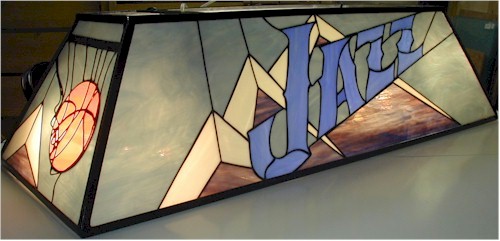
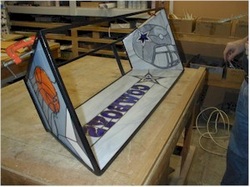
Cowboys side and Jazz side  look great. We've done other pool table lamps with other team logos.

Home

​
Stained Glass Books
​

Stained Glass Videos

​Links Page

Stained Glass
Art Therapy

​Studio Classes

OnLine Classes

​Portfolio

​Etsy Patterns

​UCAB Sourcebook

Build Your Own Table

Kaleidoscope


Tips & Articles

Patterns
Mosaic Patterns

​Contact Us

Art For Sale

​Free Videos

Creativity Quotes
​

Date Night
​
​
History Of Our Studio

​Articles About Us

​Shows And Galleries

​Join Our Email List

5 Ways To Thrive
​​

Copyright © 2016-2025