Gomm Studios   (385) 392-7989
Gomm Stained Glass
  • Home
    • Fun Quiz Page
  • Projects
  • Classes
    • Learn More About Studio Classes
  • STORE
    • Art 4 Sale
    • Amazon Shop >
      • Store-Books
      • Store-Videos
      • Store-MiscProductsWeUse
      • Store-VideoandAudio
      • Store-StainedGlassSupplies
    • Etsy
    • Tips Articles >
      • Fixing Windows >
        • Repairing Severe Damage
        • Repairing A Broken Piece Of Glass
        • Fixing A Small Break In A Big Piece Of Glass
        • Faking A Repair
        • Doing A MAJOR Repair
        • How To Repair A Leaded Panel
        • How To Repair Stained Glass That Has Separated
        • How To Rebuild A Leaded Glass Window W/ Copper Foil
        • How To Repair A Moderately Broken Art Glass Panel
        • How To Repair An Insulated Stained Glass Window
        • Changing the Border Glass In a Leaded Panel
        • Repairing A Stained Glass Panel For An Artist
        • Repair Using A Dremel Tool
        • Quick(er) Lead Repair
      • Tricks Of The Trade >
        • Insulating Glass So It Can Be Hung In A Door
        • Moving And Handling Glass
        • Cutting Diamonds On Very Rough Glass
        • How To Add Coining To A Panel For A Very "French" Look
        • How To Shorten A Stained Glass Panel
        • How To Trim And Cut A Stained Glass Panel That's Too Long
        • How To Build A Jig To Help Cut Bevels
        • How To Cut Stained Glass Without A Pattern
      • Reinforcing and Framing Glass >
        • Reinforcing A Large Panel
        • How To Aggressively Reinforce A Window
        • Soldering A Zinc Edge On A Panel
        • How To Solder A Reinforcing Edge On A Curved Panel
        • How To Put Metal Around An Octagon Shaped Panel
        • Building A Frame For Stained Glass Shutters
      • Shipping Stained Glass >
        • How To Ship Big Stained Glass Panels
        • How To Build A Solid Shipping Crate
        • How We Crate Same Size Multiples of Glass
        • How To Build A "Double Foam" Crate
        • Loading Glass On A Trailer
      • Lighting Projects >
        • Installing Art Glass In A Pool Table Lamp
        • How To Build A Panel For A Backlit Space
        • How To Reinforce A Stained Glass Skylight
        • Creating A False Skylight
        • Building A Four Sided Lamp
        • Repair A Cheap Lamp Shade
        • Building A Stained Glass Lamp With A Worden Mold
      • Installing Stained Glass >
        • How To Install Stained Glass in an Existing Window Frame
        • How To Install Stained Glass In A Cabinet Door
        • How To Hang A Stained Glass Window
        • How We Install A Panel In An Arched Window Opening
        • What Ttype Of Caulk To Use
      • Sandblasting Stained Glass >
        • How To Sandblast Stained Glass
        • How We Sand Carve A Stained Glass Transom
        • Setting Up A Sandblast System
        • How To Sand Carve A Rose In Glass
      • Organizing Your Studio >
        • Build Your Own Work Bench
        • Chemicals We Use In Our Studio
        • Getting A New Glass Order
        • Build Your Own Stained Glass Rack
        • Converting To A Lead Free Studio
      • Bring New Life To Windows >
        • Removing Corrosion From Stained Glass
        • Re-Apply Patina To Stained Glass
        • How To Clean A Really Dirty Window
        • Clean And Apply Patina To Stained Glass
        • Cleaning And Adding Patina To A New Stained Glass Panel (revisited)
        • Easily Clean Corrosion Off Of Stained Glass
      • Unusual Projects >
        • Building A Stained Glass Globe
        • The Painted Leaf Project
        • How To Paint A Face On Stained Glass
        • Fusing A Stained Glass Necklace
        • Building A Stained Glass Picture Frame
        • Building A Stained Glass Jewelry Box
        • Make Stained Glass Charms
        • Repairing A Stained Glass Angel By Making Our Own Glass
      • Soldering Techniques >
        • Fix or Reinforce Glass With A Solder Bridge
        • How To Solder For A Stained Glass Repair
        • Reclaiming Old Flux Core Solder For Use In Stained Glass
        • Soldering Technique-Fixing A Foil Problem
      • Basic Skills >
        • How To Cut Stained Glass
        • How To Cut Stained Glass with a T-square Cutter
        • How To Cut A Tight Curve In Stained Glass
        • Cutting Very Thin, Irregular Stained Glass Pieces
        • Cut Glass Using A Straight Edge
      • Advanced Craftsmanship Skills >
        • Cut Glass Using A Taurus Ring Saw
        • Drill Holes In Stained Glass With Diamond Drillbit
        • Drill Holes In Stained Glass With A Grinder
      • Business Tips >
        • Marketing Stained Glass
        • Helping Your Stained Glass Business (And Yourself) Survive With Style
        • Mistakes Happen To Us All (And Then We Fix Them)
        • Converting To A Lead Free Studio
    • Training Videos & Books >
      • Gomm Studios Portfolio 1
      • Stained Glass Mandalas For Meditation
      • Stained Glass Mandalas For Success
      • Beginning Stained Glass
      • Stars, Stars and More Stars
      • How To Install Stained Glass
      • Stained Glass Picture Frame
      • Stained Glass Jewelry Box
      • Stained Glass Kaleidoscope
      • Stained Glass Charms
      • Stained Glass Projects For The Whole Family
      • Stained Glass Fan Lamps and Night Lights >
        • Fan Lamp Class Extras
      • Stained Glass Seasonal Quilt Blocks
      • Stained Glass Desk Sets
      • Stained Glass Stars
      • "Blinders" David's SF Novel
    • Videos
    • Patterns
    • Greeting Cards
  • About Us
    • Instagram
    • Shows And Galleries
    • History Of Our Studio
    • Articles About Us
    • Links
    • Contact Us
  • Patreon
  • 5 Ways To Thrive
Picture

Glass Tips & Tricks 

Newsletters from our past converted to fresh articles about stained glass.
Picture

Cutting Diamonds On Very Rough Glass

When building French style windows, we need to cut many diamond shaped pieces and it would be tedious to draw around a pattern piece for each one. So we came up with a system for cutting them quickly. When we cut vecchio glass the challenge is even greater because of the roughness of the glass.
Picture
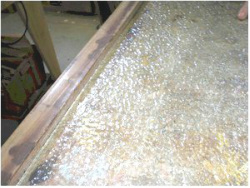
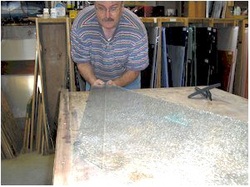
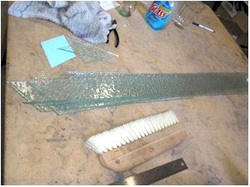
As you can see in this photo, the glass has a lot of texture. It has a rough side, which I turn down for the cutting, but the smooth side has seeds and bubbles in it, so it's tough to get a clean cut.


Picture
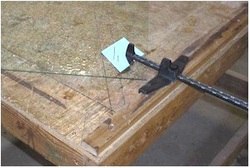
I take one diamond pattern piece and lay it out on the sheet of glass so I can get the glass oriented. I want all the pieces to run with the texture going up and down the height of the diamond, so I turn the entire sheet of glass so that the straight line I'll be cutting, lines up with the pattern piece.

Picture
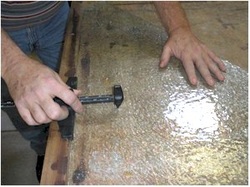
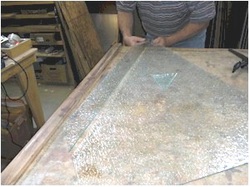
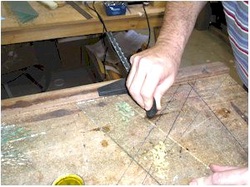
In this photo, I've already cut a few strips and I'm cutting one which runs the length of the sheet of glass. I dip the cutter in oil and run the wheel up and down the glass lightly to spread some of the oil on the surface that I'm going to score.

Picture
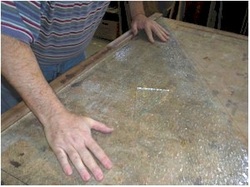
I have to hold the glass from slipping with my left hand as I score with the glass cutter using my right hand. I exert more pressure than I do when cutting smooth glass and I try to plow through the spots where the cutter hits a seedy spot and wants to stop.

Picture
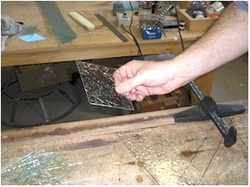
Then I grab the glass with both hands and rock them apart to break the entire strip free from the sheet of glass.


(Running pliers can be used at this point but the pieces of glass are so wide, I felt separating the glass by hand would be best.)

Picture
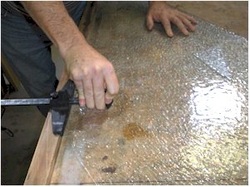
Then I slide the sheet against the strip cutter guide edge on the table to set up for the next strip.

Picture
Once again, I'm able to use my hands to rock the two pieces apart. Many times I go ahead and use running pliers when breaking strips of glass, but these are wide and the glass is uncooperative. 

Picture
This edge cut off leaving a piece that sticks out and I have to score and break off a bit of the corner before I can line the edge of the glass up against the strip cutter guide.

Picture
When I'm done, I have a whole stack of strips.

Picture
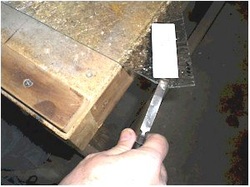
I then take the strips, one at a time and cut out diamonds. I take the pattern piece I started out with and line up the glass strip so that I'm cutting the glass at the proper angle and then I draw a line on the workbench using a sharpie marker so I can line up future strips with ease.

Picture
After scoring the diamond, I use the edge of the strip guide as a raised straight edge to snap the glass off.

Picture
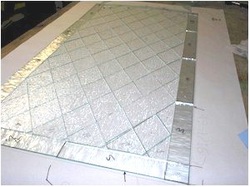
And I lay out the diamonds on my French design window pattern.

Home

​
Stained Glass Books
​

Stained Glass Videos

​Links Page

Stained Glass
Art Therapy

​Studio Classes

OnLine Classes

​Portfolio

​Etsy Patterns

​UCAB Sourcebook

Build Your Own Table

Tips & Articles

Patterns

​Contact Us

Art For Sale

​Free Videos

Creativity Quotes​

Date Night
​
​
History Of Our Studio

​Articles About Us

​Shows And Galleries

​Join Our Email List

5 Ways To Thrive
​​

Copyright © 2016-2017