

|
Glass Tips & TricksNewsletters from our past converted to fresh articles about stained glass.
|

|
How To Cut Stained Glass
Hand Held Cutter Stained Glass Cutting Demonstration Video
To learn to cut stained glass, it's helpful to begin with the proper tools. We start with a good quality glass cutter.
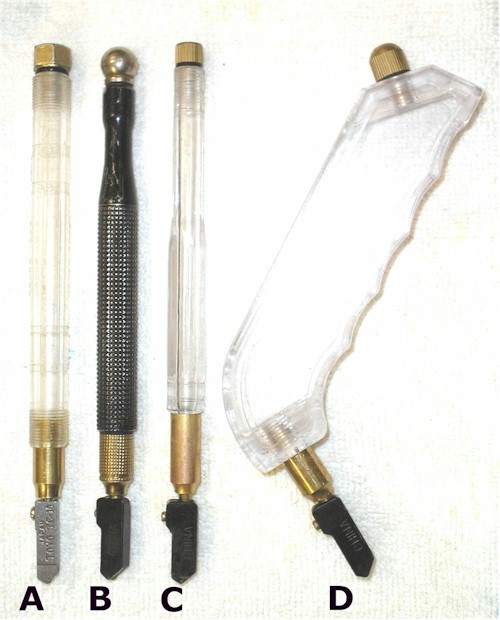
First, know that a hardware store glass cutter isn't good enough. Why, you ask? Because the wheel isn't carbide, it's steel, so it doesn't last long and because the wheel is ground to score window glass, but not all the hardness/brittleness ratings that you'll encounter cutting stained glass. Of the four cutters above, I only recommend A and B. Let's talk about each one of them.
A-is often the most expensive, you'll pay around $40 or more for it. I prefer it, a Toyo brand cutter. I bought 6 of them in 1983 and those six lasted me about 20 years. The cutter head is small so I can see where I'm going.
B-is the best for beginners because they need to learn to use a cutter before paying the big bucks. They run around $20. The cutting head is a little big, so it's harder to see where you're going. It is superior in construction. The weight of the brass and the solid round ball really makes it work well when tapping glass.
C-is a good cutter to buy because it's cheaper (around $10). The nut on the top of the cutter is now better and shaped to do a good job when tapping your glass.
D-some will disagree, but the pistol grip cutter is harder to hold and extremely hard to cut accurately. It's supposed to help avoid wrist strain, but it's actually harder on the wrist. (Students who gave both a good try agree.)
First -Dip your cutter into cutting oil (we find that filling the reservoir in the cutter wastes oil and makes a mess). Any lubricant will work, even 3in1 oil. We used to use kerosene in our studio, but when you got it on your hands or spilled it, it made the whole place smell toxic. We now use the "Orange Glass Cutting Oil" that we blend in our studio.
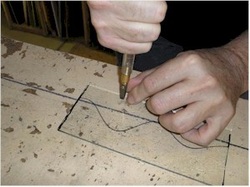
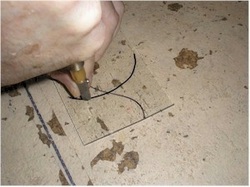
Now begin cutting by scoring the glass. Scoring is the act of creating a "scratch" at the point where the glass is to be parted. The cutter aligns the molecules in the glass, creating a weakness where the glass will easily break. Hold your glass cutter as if you're stabbing the glass. The more steady and vertical to the score the glass cutter is held, the easier the glass will break.
Now begin cutting by scoring the glass. Scoring is the act of creating a "scratch" at the point where the glass is to be parted. The cutter aligns the molecules in the glass, creating a weakness where the glass will easily break. Hold your glass cutter as if you're stabbing the glass. The more steady and vertical to the score the glass cutter is held, the easier the glass will break.
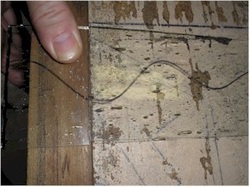
I find that guiding the cutter head with the thumb from my other hand helps me to stay more accurately on the line that I'm trying to cut. Note that the screw on the glass cutter is forward.
The sound you hear is key to getting a good score. Click Here to hear the sound.
The sound you hear is key to getting a good score. Click Here to hear the sound.
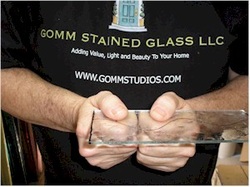
There are several ways to part the scored piece of glass when it's done in a straight line. The one used most often is accomplished by holding the glass on either side of the score with two fists below the glass and two thumbs above. Hold the glass firmly and rock both hands apart.
The rocking of the hands cause the two sides of the glass to be pressured just right and the pieces readily part.
This method demonstrates what's going on but I find I sometimes get little cuts if I rock the glass apart by hand. Using pliers or running pliers is safer.
This method demonstrates what's going on but I find I sometimes get little cuts if I rock the glass apart by hand. Using pliers or running pliers is safer.
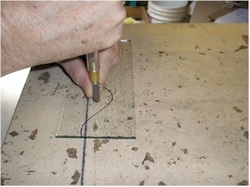
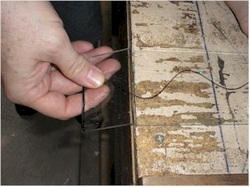
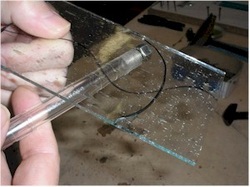
Another method, which works very well on small pieces of glass is done by placing the score line on an elevated edge and then holding the long piece with one hand and applying pressure on the other side of the score with the thumb of the other hand. The pressure easily snaps the glass into two pieces.
Another method which works well on larger pieces is done by lying the score line directly over the edge of the table and pressing the edge which is hanging over the table edge down.
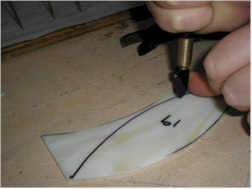
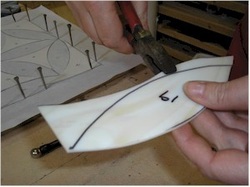
When cutting a slightly rounded piece, the scoring of the glass is the same as before. Follow just inside the line which has been traced, exerting firm pressure.
Students sometimes worry that they can't draw a straight line. To this we reply that rolling the cutter wheel is much like pushing a wheel barrow.
Students sometimes worry that they can't draw a straight line. To this we reply that rolling the cutter wheel is much like pushing a wheel barrow.
Then grab the edge of the glass to be removed with breaker/grozer pliers, grabbing it right up at the score line. Rock the pliers with the same motion as you do when rocking the hands apart. The handles of the pliers go down and the end of the pliers stay up.
We do not squeeze the pliers which would crush the glass. We hold the glass firmly and then rock the piece we're removing away from the score line.
We do not squeeze the pliers which would crush the glass. We hold the glass firmly and then rock the piece we're removing away from the score line.
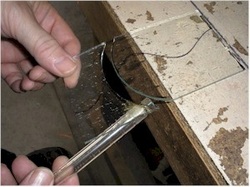
When scoring an outside curve, make sure that you allow the wheel of the cutter to roll freely. If you hear a grinding sound, the wheel isn't rolling, it's being pushed sideways across the glass. This will result in an uneven score and the results will be poor.
Now angle the glass down toward the table and hold it close to the table top so it doesn't have far to drop. Then tap the score line directly under the place you've scored. You'll need to tap all along the score line several times before the glass will drop off. Listen to the sound change as the "score" begins to "run."
When, tapping large pieces of glass, it is a good idea to lay the big piece of glass across the table top and let the smaller piece hang over the edge of the table. Hang onto the small piece of glass and as it lets loose it won't have to go crashing down onto the table.