Gomm Studios   (385) 392-7989
Gomm Stained Glass
  • Home
  • Projects
  • Classes
    • Learn More About Studio Classes
  • STORE & RESOURCES
    • Art 4 Sale
    • Amazon Shop
    • Etsy
    • Tips Articles >
      • Fixing Windows >
        • Repairing Severe Damage
        • Repairing A Broken Piece Of Glass
        • Fixing A Small Break In A Big Piece Of Glass
        • Faking A Repair
        • Doing A MAJOR Repair
        • How To Repair A Leaded Panel
        • How To Repair Stained Glass That Has Separated
        • How To Rebuild A Leaded Glass Window W/ Copper Foil
        • How To Repair A Moderately Broken Art Glass Panel
        • How To Repair An Insulated Stained Glass Window
        • Changing the Border Glass In a Leaded Panel
        • Repairing A Stained Glass Panel For An Artist
        • Repair Using A Dremel Tool
        • Quick(er) Lead Repair
      • Tricks Of The Trade >
        • Insulating Glass So It Can Be Hung In A Door
        • Moving And Handling Glass
        • Cutting Diamonds On Very Rough Glass
        • How To Add Coining To A Panel For A Very "French" Look
        • How To Shorten A Stained Glass Panel
        • How To Trim And Cut A Stained Glass Panel That's Too Long
        • How To Build A Jig To Help Cut Bevels
        • How To Cut Stained Glass Without A Pattern
      • Reinforcing and Framing Glass >
        • Reinforcing A Large Panel
        • How To Aggressively Reinforce A Window
        • Soldering A Zinc Edge On A Panel
        • How To Solder A Reinforcing Edge On A Curved Panel
        • How To Put Metal Around An Octagon Shaped Panel
        • Building A Frame For Stained Glass Shutters
      • Shipping Stained Glass >
        • How To Ship Big Stained Glass Panels
        • How To Build A Solid Shipping Crate
        • How We Crate Same Size Multiples of Glass
        • How To Build A "Double Foam" Crate
        • Loading Glass On A Trailer
      • Lighting Projects >
        • Installing Art Glass In A Pool Table Lamp
        • How To Build A Panel For A Backlit Space
        • How To Reinforce A Stained Glass Skylight
        • Creating A False Skylight
        • Building A Four Sided Lamp
        • Repair A Cheap Lamp Shade
        • Building A Stained Glass Lamp With A Worden Mold
      • Installing Stained Glass >
        • How To Install Stained Glass in an Existing Window Frame
        • How To Install Stained Glass In A Cabinet Door
        • How To Hang A Stained Glass Window
        • How We Install A Panel In An Arched Window Opening
        • What Ttype Of Caulk To Use
      • Sandblasting Stained Glass >
        • How To Sandblast Stained Glass
        • How We Sand Carve A Stained Glass Transom
        • Setting Up A Sandblast System
        • How To Sand Carve A Rose In Glass
      • Organizing Your Studio >
        • Build Your Own Work Bench
        • Chemicals We Use In Our Studio
        • Getting A New Glass Order
        • Build Your Own Stained Glass Rack
        • Converting To A Lead Free Studio
      • Bring New Life To Windows >
        • Removing Corrosion From Stained Glass
        • Re-Apply Patina To Stained Glass
        • How To Clean A Really Dirty Window
        • Clean And Apply Patina To Stained Glass
        • Cleaning And Adding Patina To A New Stained Glass Panel (revisited)
        • Easily Clean Corrosion Off Of Stained Glass
      • Unusual Projects >
        • Building A Stained Glass Globe
        • The Painted Leaf Project
        • How To Paint A Face On Stained Glass
        • Fusing A Stained Glass Necklace
        • Building A Stained Glass Picture Frame
        • Building A Stained Glass Jewelry Box
        • Make Stained Glass Charms
        • Repairing A Stained Glass Angel By Making Our Own Glass
      • Soldering Techniques >
        • Fix or Reinforce Glass With A Solder Bridge
        • How To Solder For A Stained Glass Repair
        • Reclaiming Old Flux Core Solder For Use In Stained Glass
        • Soldering Technique-Fixing A Foil Problem
      • Basic Skills >
        • How To Cut Stained Glass
        • How To Cut Stained Glass with a T-square Cutter
        • How To Cut A Tight Curve In Stained Glass
        • Cutting Very Thin, Irregular Stained Glass Pieces
        • Cut Glass Using A Straight Edge
      • Advanced Craftsmanship Skills >
        • Cut Glass Using A Taurus Ring Saw
        • Drill Holes In Stained Glass With Diamond Drillbit
        • Drill Holes In Stained Glass With A Grinder
      • Business Tips >
        • Marketing Stained Glass
        • Helping Your Stained Glass Business (And Yourself) Survive With Style
        • Mistakes Happen To Us All (And Then We Fix Them)
        • Converting To A Lead Free Studio
    • YouTube Videos
    • Free Patterns
  • About Us
    • Instagram
    • Shows And Galleries
    • History Of Our Studio
    • Articles About Us
    • Links
    • Contact Us
Picture

Glass Tips & Tricks 

Newsletters from our past converted to fresh articles about stained glass.
Picture

Build Your Own Work Bench

Picture
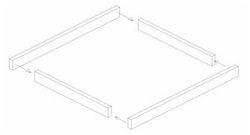
1. Start with the top frame which is made of 2 sets of two by fours, 2-48” long and 2-33” long. The total dimension of the top frame will measure 48” x 36” when screwed together. Use glue at the joints and run two 3-1/2” deck screws in the long 2 x 4’s at each end to join them to the shorter boards. (Some folks like to add additional strength to the table by adding an additional short board in the middle of the frame, but this is not necessary).
Build 2 of these frames at the same time, the second will serve as the footrest and bracing for the legs.

Picture
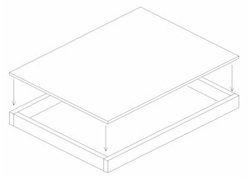
2. Next, screw the 48” x 36”, ¾” (or ½”) particle board top to the top frame (you may substitute with plywood if desired). You may want to just use screws (no glue) to attach the table top to the frame so that it will be easy to replace it if you ever need to. Screws to attach the top should be spaced 6” apart and be at least 1-1/2” in length.

Picture
3. Next, turn the table top upside down and attach the 4 32-1/2” legs to the table top. The boards should rest inside the framework and touch the underside of the table top. 3-1/2” screws should be used to attach the legs and they should be run into the legs from both directions.

Picture
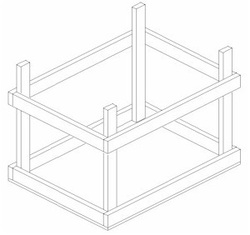
4. Before turning the table over, measure down on the legs 8” and attach the extra frame work you built in step 1. When you turn the table over, the top of the frame will be 11-1/2” from the floor, a good height to be able to use as a footrest and to be able to sweep under. 
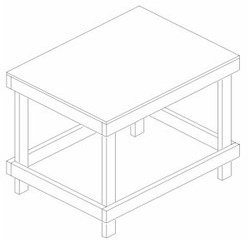
Some folks like to add a shelf to the top of the foot rest for storing light objects. This is best done when the table is turned over. Also, a ¾ thick x 1-1/2” wide cleat added to one side of the workbench will give you a good way to use a strip cutter.

Picture
Bill Of Materials 6 – 2 x 4 x 8’
1 – ¾ x 3’ x 4’ particle board or plywood
3-1/2” Deck Screws
1” or longer screws for top attachment
Glue
Optional – ¾ x 1-1/2” choice lumber for cleat 


Cut List 
4 – Long Frame Pieces – 48”
4 – Short Frame Pieces – 33”
4 – Legs – 32-1/2”
1 – ¾ x 3’ x 4’ particle board or plywood 


 I hope you enjoy using your workbench. 

Below are photos of putting a shelf on the bottom of the table.
Picture
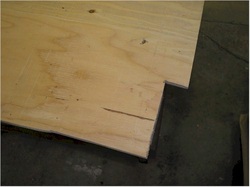
You need to notch out the plywood, so that the shelf will fit around the legs of the worktable. It's a good idea to install it before the top goes on.

Picture
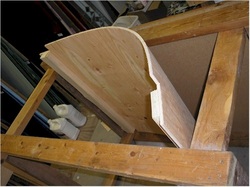
Otherwise, you'll have to bend it to get it in place and that's not a really elegant way to do things.

Picture
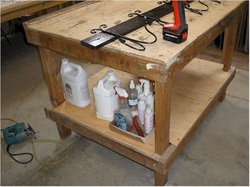
But, here's the shelf, not ten minutes after installation and it's already being put to good use.

Picture
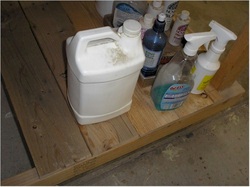
And here's a more traditional way to add a shelf. Just add a row of boards.

Home

​
Stained Glass Books
​

Stained Glass Videos

​Links Page

Stained Glass
Art Therapy

​Studio Classes

OnLine Classes

​Portfolio

​Etsy Patterns

​UCAB Sourcebook

Build Your Own Table

​Kaleidoscope


Tips & Articles

Patterns
Mosaic Patterns

​Contact Us

Art For Sale

​Free Videos

Creativity Quotes
​

Date Night
​
​
History Of Our Studio

​Articles About Us

​Shows And Galleries

​Join Our Email List

5 Ways To Thrive
​​

Copyright © 2016-2024