Gomm Studios   (385) 392-7989
Gomm Stained Glass
  • Home
    • Fun Quiz Page
  • Projects
  • Classes
    • Learn More About Studio Classes
  • STORE
    • Art 4 Sale
    • Amazon Shop >
      • Store-Books
      • Store-Videos
      • Store-MiscProductsWeUse
      • Store-VideoandAudio
      • Store-StainedGlassSupplies
    • Etsy
    • Tips Articles >
      • Fixing Windows >
        • Repairing Severe Damage
        • Repairing A Broken Piece Of Glass
        • Fixing A Small Break In A Big Piece Of Glass
        • Faking A Repair
        • Doing A MAJOR Repair
        • How To Repair A Leaded Panel
        • How To Repair Stained Glass That Has Separated
        • How To Rebuild A Leaded Glass Window W/ Copper Foil
        • How To Repair A Moderately Broken Art Glass Panel
        • How To Repair An Insulated Stained Glass Window
        • Changing the Border Glass In a Leaded Panel
        • Repairing A Stained Glass Panel For An Artist
        • Repair Using A Dremel Tool
        • Quick(er) Lead Repair
      • Tricks Of The Trade >
        • Insulating Glass So It Can Be Hung In A Door
        • Moving And Handling Glass
        • Cutting Diamonds On Very Rough Glass
        • How To Add Coining To A Panel For A Very "French" Look
        • How To Shorten A Stained Glass Panel
        • How To Trim And Cut A Stained Glass Panel That's Too Long
        • How To Build A Jig To Help Cut Bevels
        • How To Cut Stained Glass Without A Pattern
      • Reinforcing and Framing Glass >
        • Reinforcing A Large Panel
        • How To Aggressively Reinforce A Window
        • Soldering A Zinc Edge On A Panel
        • How To Solder A Reinforcing Edge On A Curved Panel
        • How To Put Metal Around An Octagon Shaped Panel
        • Building A Frame For Stained Glass Shutters
      • Shipping Stained Glass >
        • How To Ship Big Stained Glass Panels
        • How To Build A Solid Shipping Crate
        • How We Crate Same Size Multiples of Glass
        • How To Build A "Double Foam" Crate
        • Loading Glass On A Trailer
      • Lighting Projects >
        • Installing Art Glass In A Pool Table Lamp
        • How To Build A Panel For A Backlit Space
        • How To Reinforce A Stained Glass Skylight
        • Creating A False Skylight
        • Building A Four Sided Lamp
        • Repair A Cheap Lamp Shade
        • Building A Stained Glass Lamp With A Worden Mold
      • Installing Stained Glass >
        • How To Install Stained Glass in an Existing Window Frame
        • How To Install Stained Glass In A Cabinet Door
        • How To Hang A Stained Glass Window
        • How We Install A Panel In An Arched Window Opening
        • What Ttype Of Caulk To Use
      • Sandblasting Stained Glass >
        • How To Sandblast Stained Glass
        • How We Sand Carve A Stained Glass Transom
        • Setting Up A Sandblast System
        • How To Sand Carve A Rose In Glass
      • Organizing Your Studio >
        • Build Your Own Work Bench
        • Chemicals We Use In Our Studio
        • Getting A New Glass Order
        • Build Your Own Stained Glass Rack
        • Converting To A Lead Free Studio
      • Bring New Life To Windows >
        • Removing Corrosion From Stained Glass
        • Re-Apply Patina To Stained Glass
        • How To Clean A Really Dirty Window
        • Clean And Apply Patina To Stained Glass
        • Cleaning And Adding Patina To A New Stained Glass Panel (revisited)
        • Easily Clean Corrosion Off Of Stained Glass
      • Unusual Projects >
        • Building A Stained Glass Globe
        • The Painted Leaf Project
        • How To Paint A Face On Stained Glass
        • Fusing A Stained Glass Necklace
        • Building A Stained Glass Picture Frame
        • Building A Stained Glass Jewelry Box
        • Make Stained Glass Charms
        • Repairing A Stained Glass Angel By Making Our Own Glass
      • Soldering Techniques >
        • Fix or Reinforce Glass With A Solder Bridge
        • How To Solder For A Stained Glass Repair
        • Reclaiming Old Flux Core Solder For Use In Stained Glass
        • Soldering Technique-Fixing A Foil Problem
      • Basic Skills >
        • How To Cut Stained Glass
        • How To Cut Stained Glass with a T-square Cutter
        • How To Cut A Tight Curve In Stained Glass
        • Cutting Very Thin, Irregular Stained Glass Pieces
        • Cut Glass Using A Straight Edge
      • Advanced Craftsmanship Skills >
        • Cut Glass Using A Taurus Ring Saw
        • Drill Holes In Stained Glass With Diamond Drillbit
        • Drill Holes In Stained Glass With A Grinder
      • Business Tips >
        • Marketing Stained Glass
        • Helping Your Stained Glass Business (And Yourself) Survive With Style
        • Mistakes Happen To Us All (And Then We Fix Them)
        • Converting To A Lead Free Studio
    • Training Videos & Books >
      • Gomm Studios Portfolio 1
      • Stained Glass Mandalas For Meditation
      • Stained Glass Mandalas For Success
      • Beginning Stained Glass
      • Stars, Stars and More Stars
      • How To Install Stained Glass
      • Stained Glass Picture Frame
      • Stained Glass Jewelry Box
      • Stained Glass Kaleidoscope
      • Stained Glass Charms
      • Stained Glass Projects For The Whole Family
      • Stained Glass Fan Lamps and Night Lights >
        • Fan Lamp Class Extras
      • Stained Glass Seasonal Quilt Blocks
      • Stained Glass Desk Sets
      • Stained Glass Stars
      • "Blinders" David's SF Novel
    • Videos
    • Patterns
    • Greeting Cards
  • About Us
    • Instagram
    • Shows And Galleries
    • History Of Our Studio
    • Articles About Us
    • Links
    • Contact Us
  • Patreon
  • 5 Ways To Thrive
Picture

Glass Tips & Tricks 

Newsletters from our past converted to fresh articles about stained glass.
Picture

Building A Four Sided Lamp

Picture
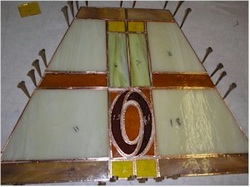
The four sided lamp is made of four flat panels. This is a traditional mission style inspired by flat panels of the 19th century. (you can download the pattern by clicking here).

The sides are built using the same techniques as any flat panel. Precision is more important, because the pieces will need to be the same to fit together properly.
...Select opaque glass so that light from the bulb doesn't burn through the lamp when it's in use
. 


Picture
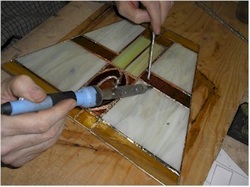
Once it's laid out, solder each of the four panels as you normally would and tin the edges. Use care to make the tinned edges smooth so they will fit together easily. 

Picture
Once all four are soldered, you'll be able to start putting the lamp together. Start with two of the panels and tack solder them, then add another panel and the last. The shade will be very unstable and may not even be as square as you want it, but that won't be the case much longer. 

Picture
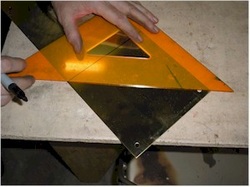
Measure for the top cap that will hold the shade in place. We used a brass kick-plate for this shade, copper and brass are the most common materials for top cap and can be found at most sheet metal shops.

Picture
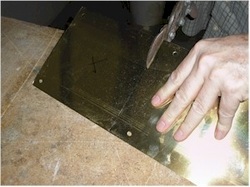
Tin snips make it easy to cut the square to size.

Picture
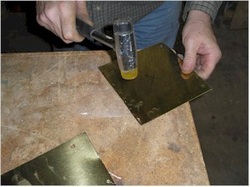
You may then need to flatten it back to a flat shape.

Picture
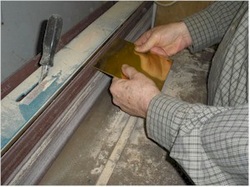
Since we have the sander left over from furniture building days, I smoothed out the edges, an extra step that wasn't absolutely necessary. 

Picture
Then I stamped our name in the cap, since this is not only a piece off art, but could be collectible in years to come.

Picture
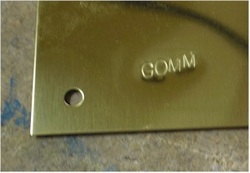
The finished stamping.

Picture
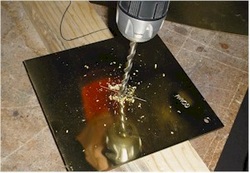
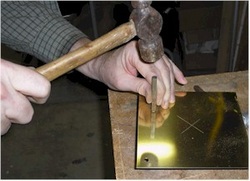
Then drill a center hole just the right size for the pin on the lamp to fit through.

Picture
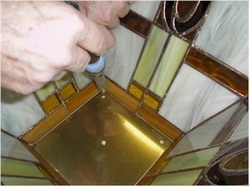
Now place the cap at the bottom of the shade and square up the panels so that there is the same amount of gap on each side. This will insure that the whole shade is square. 


 Solder the cap to the shade and the shade will go from weak and unstable to firm and fairly rigid.


Picture
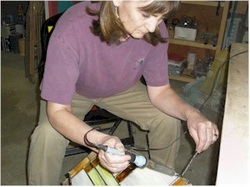
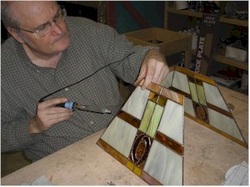
Now you can solder the outside lead lines completely. Place the lamp shade in a box filled with crumpled newspaper and shift it so that the lead line you're soldering is horizontal.


Turning the temperature down on the soldering iron may help to keep melt through at a minimum.


Picture
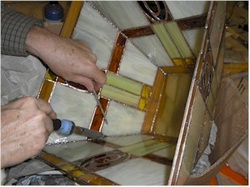
Once the outside is soldered a quick pass along the inside corners will smooth them nicely.

Picture
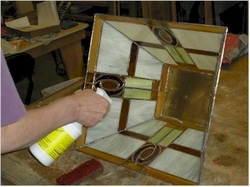
Then clean, patina and polish as you would any other project.

Picture
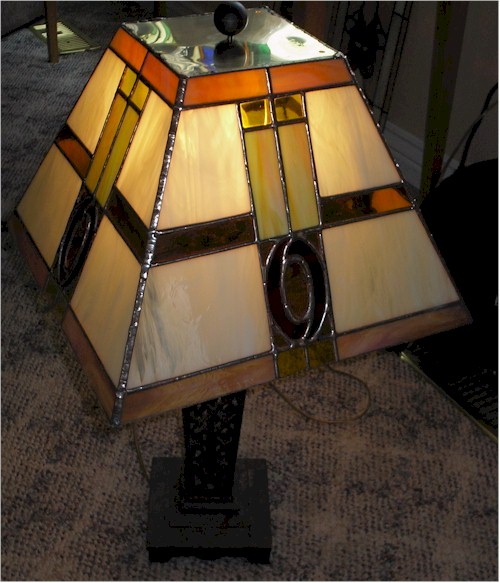
The completed lamp is done and looks marvelous.

Home

​
Stained Glass Books
​

Stained Glass Videos

​Links Page

Stained Glass
Art Therapy

​Studio Classes

OnLine Classes

​Portfolio

​Etsy Patterns

​UCAB Sourcebook

Build Your Own Table

Tips & Articles

Patterns

​Contact Us

Art For Sale

​Free Videos

Creativity Quotes​

Date Night
​
​
History Of Our Studio

​Articles About Us

​Shows And Galleries

​Join Our Email List

5 Ways To Thrive
​​

Copyright © 2016-2017