

|
Glass Tips & TricksNewsletters from our past converted to fresh articles about stained glass.
|

|
How To Hang A Stained Glass Window

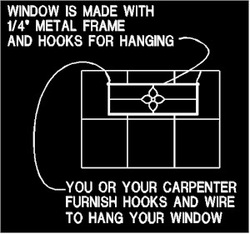
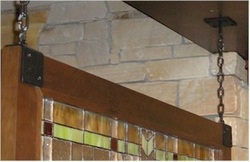
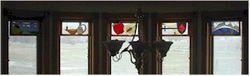
The key here is we're talking about "Hanging" a stained glass window. See the window in the picture? It's framed in 1/4" zinc outer bar and is hung by two 3/4" round rings.
We're not talking about installing it in a cabinet door, or in an existing framework. There are other articles on the website about hanging windows using that method.
We're talking about hanging a framed piece of glass. Either wood framed or metal framed.
There's no time limit on a temporary install. You may hang a panel for a few days and come back years later to discover it's still there. So the hanging methods described in this article can be considered either temporary or permanent.
The simplest way to hang a stained glass panel is to attach some hooks to the existing framework of the window and hang the stained glass with wire or chain. This is a good way for people who plan to move and want to take their window with them. The stained glass can be much smaller than the existing window frame.
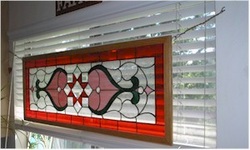
This is the method the Art Deco window above is being hung.
This is the method the Art Deco window above is being hung.
This window was slipped into a wooden frame made especially to fit the piece. There are 1/2" X 1 1/4" hooks holding the window in place. Also some very stout 14 gauge copper wire connecting the hooks to each other on both sides.
It would have been more conventional to hang the hooks above the ends of the window and to hang the window from chain, but that would have interfered with the operation of the shutters and the decorative cover that was already in place.
It would have been more conventional to hang the hooks above the ends of the window and to hang the window from chain, but that would have interfered with the operation of the shutters and the decorative cover that was already in place.
You can see how the hooks are placed in the oak frame and into the wall. I was careful that the screws were long enough and set over far enough to get a good bite into the 2x4 framing below the sheetrock.
Make sure to get into the framing so the window is well supported.
Also, drill a pilot hole with a bit that's smaller than the diameter of your hook into the oak frame to avoid splintering it.
Make sure to get into the framing so the window is well supported.
Also, drill a pilot hole with a bit that's smaller than the diameter of your hook into the oak frame to avoid splintering it.
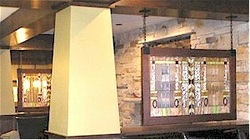
These windows were installed in very heavy frames to go with the ski lodges' decor. The panels were centered in the wooden frames and had wood stops placed in either side of the frames to hold the panels in place.
To go along with the heavy look, a blacksmith friend forged metal U's and plates which were attached to 1" forged chain and screwed to the wooden frame and to the wood above.
This is overkill, the hardware didn't need to be so stout but it really looked good with all the wood and rock and ornamental iron in the lodge.
This is overkill, the hardware didn't need to be so stout but it really looked good with all the wood and rock and ornamental iron in the lodge.

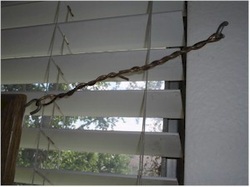
The temporary hanging of the Art Deco window that was the first picture in this article was done by putting deck screws into the framework over the window.
Then strong, stout wire was wound about the screws and run through the ring at the corners of the zinc frame.
Then strong, stout wire was wound about the screws and run through the ring at the corners of the zinc frame.
The two wires held the window in place for all the time the panel hung in the window. If the hanging were to be in place permanently, we would have replaced the temporary wire with chain.
We went back later and soldered on a middle ring so it could be hung with third wire to prevent the panel from bowing.
We went back later and soldered on a middle ring so it could be hung with third wire to prevent the panel from bowing.
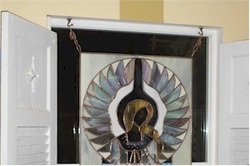
Here, an angel panel is hung in a semi-permanent manner using hooks and chain. I would have turned the hooks to face out since the chain is at an angle.
This photo shows a panel that we soldered 4 copper tabs to. They allowed the owner to hang the window on a door in a rental property. She simply used drywall screws which were attached to the framework in the window of the door it was placed on.
When she moved, the window was easily removed and the tabs were de-soldered from the window.
When she moved, the window was easily removed and the tabs were de-soldered from the window.
These panels simply hang from cup hooks by the rings attached to them.
This panel hangs from cup hooks and use fishing line to hang lower into the center of the window in an almost invisible way.
We never recommend that suction cups be used to hang glass and we avoid fishing line except for temporary solutions.
We never recommend that suction cups be used to hang glass and we avoid fishing line except for temporary solutions.
This window was hung by hardware chain (jack chain) to keep folks from accidentally running into the clear glass.
Here's an extreme example of hanging windows. Four windows are attached to a hanging rail above the store window and then more windows hang from those four windows. That's a lot of wire and the potential was there for a real mess. But it was simple to remove one window when it was sold. Later we replaced this method with hardware chain, much neater and better looking.