

|
Glass Tips & TricksNewsletters from our past converted to fresh articles about stained glass.
|

|
Reinforcing A Large Panel
We recommend that windows which exceed 3' by 4' in size be reinforced to prevent breakage. If a window is 3' by 3', it might not need to be reinforced, that's usually a judgment call based on where it is to be installed.
In the old days, when a panel was large and needed to be reinforced, artists actually installed big pieces of rebar, no kidding rebar, in window frames and wired the stained glass to the rebar. This was an effective method of reinforcement, but it was far from attractive.
Now, I'm not complaining, but doesn't the art of stained glass have enough restrictions already? Are you telling me that I'm going to have to work my beautiful design around chunks of concrete reinforcement? Fortunately there's something fairly new on the scene to help in that area.
The secret? A thin strip of copper which is thin enough to fit between existing lead lines (Re-Strip from Ventura). You solder them in place and you've got a substantially stronger panel.
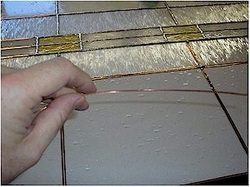
How can that be? It's so thin and floppy? See how easily it bends.
That's part of what's so cool about this strip of copper, it bends easily in one direction, allowing us to follow the most meandering lead lines, but it's fairly rigid in the other direction, adding strength to the glass.
Before this new copper strip was available, we used to go to a sheet metal shop and have them cut 1/4" wide strips of thin gauge copper on the shear. Then we had to bend it to follow our lead lines using needle nosed pliers. It was fairly complex and when done, you still had a piece of copper that stood 1/4" above the surface of the window. It sometimes cast a shadow on the panel and soldering the back was a challenge as well.
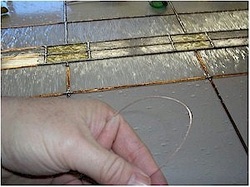
When reinforcing a window (using this or any other method) it is important to remember that the reinforcement must run from one side of the window to the other to do any good. If a piece of copper is run to the middle and then it just stops, you will actually be creating a place where more stress will be applied to that spot and the window could break there.
The copper strip comes in a roll and will cover a lot of glass. The idea is to run the copper back and forth along lead lines so the glass will have more strength than it did before, and will transfer the stresses on it to it's outer edge where it is stronger since it's installed in some sort of rugged framework. This will prevent the glass from getting cracks either from being pushed on, or from the weight of the glass being pulled down by gravity over time and sagging.
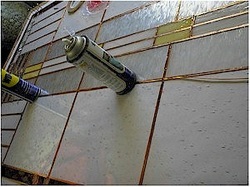
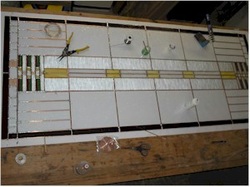
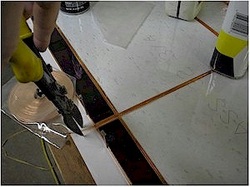
This panel is so large that we need to reinforce it a great deal. I begin by running strips up and down the length of the window. I used some spray cans which were handy to weight the strip down in between the glass. Make sure if you use this method to remove cans before soldering because heat and pressurized cans can be hazardous.
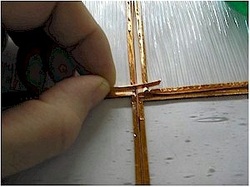
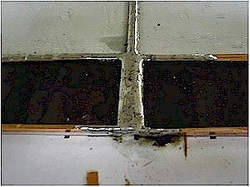
At places where the copper strip intersects another piece of copper, I have to cut the new piece so I can continue on across the panel.
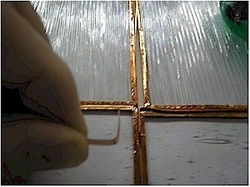
I bend a little "L" on the end so the copper won't slide as I install it. Then I gently press it in between the glass, the foil and the other copper strips. I use something to weight it down, or it will pop out from between the glass.
I then string the copper out to the edge of the panel. When doing this, I keep the roll of copper in the bag it came in and gently pull it out as I need it. I use care not to let it tangle or slip out of the bag so that I don't have to relive the disaster with my "Slinky" when I was a kid.
I use tin snips to cut the copper, about 1/4" from the edge of the glass.
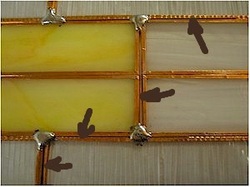
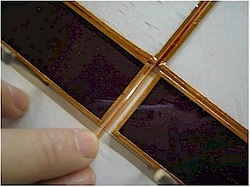
With all the reinforcement strips in place, I begin to tack the glass together. I make sure that the glass is pushed into the right place (on pattern), the copper has a tendency to push things around. Arrows point to all the places where copper has been installed to properly reinforce this panel.
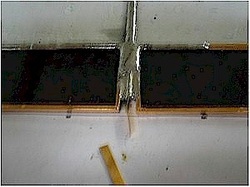
After soldering the panel, I need to clean up the areas where copper extends beyond the edges.
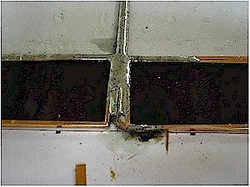
Using the tip of my soldering iron, I push the copper strip over the edge, which bends it.
Holding the strip in place with needle nosed pliers, I solder the copper against the edge of the foil. When it's done, you can't even tell that the window has been reinforced.
Since this panel is being installed in a door, once it's soldered, it gets sent out to be encased in tempered glass and insulated. The tempered glass adds an additional amount of strength to the panel.
Since this panel is being installed in a door, once it's soldered, it gets sent out to be encased in tempered glass and insulated. The tempered glass adds an additional amount of strength to the panel.