Gomm Studios   (385) 392-7989
Gomm Stained Glass
  • Home
  • Projects
  • Classes
    • Learn More About Studio Classes
  • STORE & RESOURCES
    • Art 4 Sale
    • Amazon Shop
    • Etsy
    • Tips Articles >
      • Fixing Windows >
        • Repairing Severe Damage
        • Repairing A Broken Piece Of Glass
        • Fixing A Small Break In A Big Piece Of Glass
        • Faking A Repair
        • Doing A MAJOR Repair
        • How To Repair A Leaded Panel
        • How To Repair Stained Glass That Has Separated
        • How To Rebuild A Leaded Glass Window W/ Copper Foil
        • How To Repair A Moderately Broken Art Glass Panel
        • How To Repair An Insulated Stained Glass Window
        • Changing the Border Glass In a Leaded Panel
        • Repairing A Stained Glass Panel For An Artist
        • Repair Using A Dremel Tool
        • Quick(er) Lead Repair
      • Tricks Of The Trade >
        • Insulating Glass So It Can Be Hung In A Door
        • Moving And Handling Glass
        • Cutting Diamonds On Very Rough Glass
        • How To Add Coining To A Panel For A Very "French" Look
        • How To Shorten A Stained Glass Panel
        • How To Trim And Cut A Stained Glass Panel That's Too Long
        • How To Build A Jig To Help Cut Bevels
        • How To Cut Stained Glass Without A Pattern
      • Reinforcing and Framing Glass >
        • Reinforcing A Large Panel
        • How To Aggressively Reinforce A Window
        • Soldering A Zinc Edge On A Panel
        • How To Solder A Reinforcing Edge On A Curved Panel
        • How To Put Metal Around An Octagon Shaped Panel
        • Building A Frame For Stained Glass Shutters
      • Shipping Stained Glass >
        • How To Ship Big Stained Glass Panels
        • How To Build A Solid Shipping Crate
        • How We Crate Same Size Multiples of Glass
        • How To Build A "Double Foam" Crate
        • Loading Glass On A Trailer
      • Lighting Projects >
        • Installing Art Glass In A Pool Table Lamp
        • How To Build A Panel For A Backlit Space
        • How To Reinforce A Stained Glass Skylight
        • Creating A False Skylight
        • Building A Four Sided Lamp
        • Repair A Cheap Lamp Shade
        • Building A Stained Glass Lamp With A Worden Mold
      • Installing Stained Glass >
        • How To Install Stained Glass in an Existing Window Frame
        • How To Install Stained Glass In A Cabinet Door
        • How To Hang A Stained Glass Window
        • How We Install A Panel In An Arched Window Opening
        • What Ttype Of Caulk To Use
      • Sandblasting Stained Glass >
        • How To Sandblast Stained Glass
        • How We Sand Carve A Stained Glass Transom
        • Setting Up A Sandblast System
        • How To Sand Carve A Rose In Glass
      • Organizing Your Studio >
        • Build Your Own Work Bench
        • Chemicals We Use In Our Studio
        • Getting A New Glass Order
        • Build Your Own Stained Glass Rack
        • Converting To A Lead Free Studio
      • Bring New Life To Windows >
        • Removing Corrosion From Stained Glass
        • Re-Apply Patina To Stained Glass
        • How To Clean A Really Dirty Window
        • Clean And Apply Patina To Stained Glass
        • Cleaning And Adding Patina To A New Stained Glass Panel (revisited)
        • Easily Clean Corrosion Off Of Stained Glass
      • Unusual Projects >
        • Building A Stained Glass Globe
        • The Painted Leaf Project
        • How To Paint A Face On Stained Glass
        • Fusing A Stained Glass Necklace
        • Building A Stained Glass Picture Frame
        • Building A Stained Glass Jewelry Box
        • Make Stained Glass Charms
        • Repairing A Stained Glass Angel By Making Our Own Glass
      • Soldering Techniques >
        • Fix or Reinforce Glass With A Solder Bridge
        • How To Solder For A Stained Glass Repair
        • Reclaiming Old Flux Core Solder For Use In Stained Glass
        • Soldering Technique-Fixing A Foil Problem
      • Basic Skills >
        • How To Cut Stained Glass
        • How To Cut Stained Glass with a T-square Cutter
        • How To Cut A Tight Curve In Stained Glass
        • Cutting Very Thin, Irregular Stained Glass Pieces
        • Cut Glass Using A Straight Edge
      • Advanced Craftsmanship Skills >
        • Cut Glass Using A Taurus Ring Saw
        • Drill Holes In Stained Glass With Diamond Drillbit
        • Drill Holes In Stained Glass With A Grinder
      • Business Tips >
        • Marketing Stained Glass
        • Helping Your Stained Glass Business (And Yourself) Survive With Style
        • Mistakes Happen To Us All (And Then We Fix Them)
        • Converting To A Lead Free Studio
    • YouTube Videos
    • Free Patterns
  • About Us
    • Instagram
    • Shows And Galleries
    • History Of Our Studio
    • Articles About Us
    • Links
    • Contact Us
Picture

Glass Tips & Tricks 

Newsletters from our past converted to fresh articles about stained glass.
Picture

How To Build A "Double Foam" Crate

When a window arrived at a clients address, with a slight crack in the border glass, we were very glad that we had built the crate to specifications. The insurance on the parcel was more than enough to cover the replacement of the glass, but it is a nuisance to have to build or repair the glass and the customer is inconvenienced.
Picture
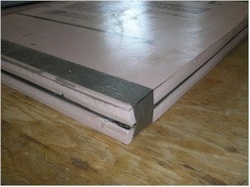
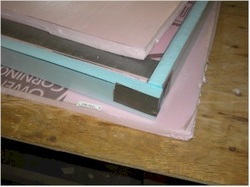
The secret is to keep the damage from happening in the first place. And that means adding extra foam to the packaging.  Here is a piece of glass with 1" of foam on the top and bottom of the panel to protect it.


Picture
Edge foam is marked to protect all four of the edges of the glass.

Picture
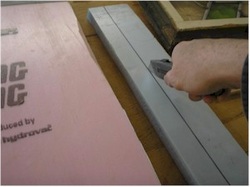
A utility knife is used to score the edge foam.

Picture
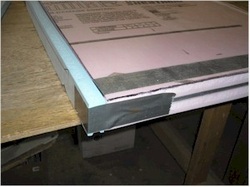
The foam is placed to surround the perimeter of the package.

Picture
Then we place the package on to another layer of foam to cut it to size to be doubly sure the panel is protected. 

Picture
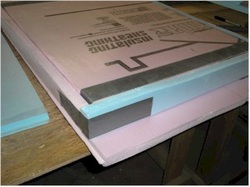
A piece is cut for the top and the bottom of the package.

Picture
Then the edges are treated with another layer of foam. With it completed, there are two 1" layers of foam protecting the glass. A total of 2" surrounding the glass on all sides.

Picture
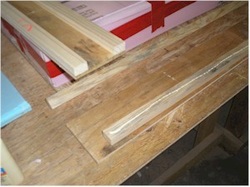
We glue and staple sticks to the plywood we build the case from to add support to the case.

Picture
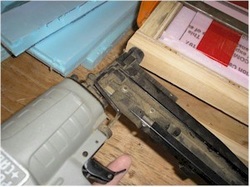
The ends are nailed to the sides of the box.

Picture
The top is screwed on so that the crate can be easily opened. We sand the wood to get rid of all sharp edges.

Picture
The finished case rests here, relaxing against a sofa, waiting for a ride to the delivery store.

We've found that we can save some time and materials by simply building the foam part of the crate, straping it together with duct tape, and taking that to the UPS store and having them put it in a larger box which gets filled with styrofoam peanut packing material. It's lighter, it cushions the glass more and their insurance stands behind it since they did the final packing.


***Update***

Nowadays, we use the white Styrofoam sheets of insulation that can be obtained from home improvement centers. It has more "give" to it. Also, once the package of glass and insulation is completed, we add an additional layer of insulation all around the package. This insures that we have at least 2" of foam around the glass (which the shipping companies require). 

See instructions for extra foam crate.

We frequently use the techniques described in another article: How to build a multi-crate.

Home

​
Stained Glass Books
​

Stained Glass Videos

​Links Page

Stained Glass
Art Therapy

​Studio Classes

OnLine Classes

​Portfolio

​Etsy Patterns

​UCAB Sourcebook

Build Your Own Table

Kaleidoscope


Tips & Articles

Patterns
Mosaic Patterns

​Contact Us

Art For Sale

​Free Videos

Creativity Quotes
​

Date Night
​
​
History Of Our Studio

​Articles About Us

​Shows And Galleries

​Join Our Email List

5 Ways To Thrive
​​

Copyright © 2016-2025