Gomm Studios   (385) 392-7989
Gomm Stained Glass
  • Home
    • Fun Quiz Page
  • Projects
  • Classes
    • Learn More About Studio Classes
  • STORE
    • Art 4 Sale
    • Amazon Shop >
      • Store-Books
      • Store-Videos
      • Store-MiscProductsWeUse
      • Store-VideoandAudio
      • Store-StainedGlassSupplies
    • Etsy
    • Tips Articles >
      • Fixing Windows >
        • Repairing Severe Damage
        • Repairing A Broken Piece Of Glass
        • Fixing A Small Break In A Big Piece Of Glass
        • Faking A Repair
        • Doing A MAJOR Repair
        • How To Repair A Leaded Panel
        • How To Repair Stained Glass That Has Separated
        • How To Rebuild A Leaded Glass Window W/ Copper Foil
        • How To Repair A Moderately Broken Art Glass Panel
        • How To Repair An Insulated Stained Glass Window
        • Changing the Border Glass In a Leaded Panel
        • Repairing A Stained Glass Panel For An Artist
        • Repair Using A Dremel Tool
        • Quick(er) Lead Repair
      • Tricks Of The Trade >
        • Insulating Glass So It Can Be Hung In A Door
        • Moving And Handling Glass
        • Cutting Diamonds On Very Rough Glass
        • How To Add Coining To A Panel For A Very "French" Look
        • How To Shorten A Stained Glass Panel
        • How To Trim And Cut A Stained Glass Panel That's Too Long
        • How To Build A Jig To Help Cut Bevels
        • How To Cut Stained Glass Without A Pattern
      • Reinforcing and Framing Glass >
        • Reinforcing A Large Panel
        • How To Aggressively Reinforce A Window
        • Soldering A Zinc Edge On A Panel
        • How To Solder A Reinforcing Edge On A Curved Panel
        • How To Put Metal Around An Octagon Shaped Panel
        • Building A Frame For Stained Glass Shutters
      • Shipping Stained Glass >
        • How To Ship Big Stained Glass Panels
        • How To Build A Solid Shipping Crate
        • How We Crate Same Size Multiples of Glass
        • How To Build A "Double Foam" Crate
        • Loading Glass On A Trailer
      • Lighting Projects >
        • Installing Art Glass In A Pool Table Lamp
        • How To Build A Panel For A Backlit Space
        • How To Reinforce A Stained Glass Skylight
        • Creating A False Skylight
        • Building A Four Sided Lamp
        • Repair A Cheap Lamp Shade
        • Building A Stained Glass Lamp With A Worden Mold
      • Installing Stained Glass >
        • How To Install Stained Glass in an Existing Window Frame
        • How To Install Stained Glass In A Cabinet Door
        • How To Hang A Stained Glass Window
        • How We Install A Panel In An Arched Window Opening
        • What Ttype Of Caulk To Use
      • Sandblasting Stained Glass >
        • How To Sandblast Stained Glass
        • How We Sand Carve A Stained Glass Transom
        • Setting Up A Sandblast System
        • How To Sand Carve A Rose In Glass
      • Organizing Your Studio >
        • Build Your Own Work Bench
        • Chemicals We Use In Our Studio
        • Getting A New Glass Order
        • Build Your Own Stained Glass Rack
        • Converting To A Lead Free Studio
      • Bring New Life To Windows >
        • Removing Corrosion From Stained Glass
        • Re-Apply Patina To Stained Glass
        • How To Clean A Really Dirty Window
        • Clean And Apply Patina To Stained Glass
        • Cleaning And Adding Patina To A New Stained Glass Panel (revisited)
        • Easily Clean Corrosion Off Of Stained Glass
      • Unusual Projects >
        • Building A Stained Glass Globe
        • The Painted Leaf Project
        • How To Paint A Face On Stained Glass
        • Fusing A Stained Glass Necklace
        • Building A Stained Glass Picture Frame
        • Building A Stained Glass Jewelry Box
        • Make Stained Glass Charms
        • Repairing A Stained Glass Angel By Making Our Own Glass
      • Soldering Techniques >
        • Fix or Reinforce Glass With A Solder Bridge
        • How To Solder For A Stained Glass Repair
        • Reclaiming Old Flux Core Solder For Use In Stained Glass
        • Soldering Technique-Fixing A Foil Problem
      • Basic Skills >
        • How To Cut Stained Glass
        • How To Cut Stained Glass with a T-square Cutter
        • How To Cut A Tight Curve In Stained Glass
        • Cutting Very Thin, Irregular Stained Glass Pieces
        • Cut Glass Using A Straight Edge
      • Advanced Craftsmanship Skills >
        • Cut Glass Using A Taurus Ring Saw
        • Drill Holes In Stained Glass With Diamond Drillbit
        • Drill Holes In Stained Glass With A Grinder
      • Business Tips >
        • Marketing Stained Glass
        • Helping Your Stained Glass Business (And Yourself) Survive With Style
        • Mistakes Happen To Us All (And Then We Fix Them)
        • Converting To A Lead Free Studio
    • Training Videos & Books >
      • Gomm Studios Portfolio 1
      • Stained Glass Mandalas For Meditation
      • Stained Glass Mandalas For Success
      • Beginning Stained Glass
      • Stars, Stars and More Stars
      • How To Install Stained Glass
      • Stained Glass Picture Frame
      • Stained Glass Jewelry Box
      • Stained Glass Kaleidoscope
      • Stained Glass Charms
      • Stained Glass Projects For The Whole Family
      • Stained Glass Fan Lamps and Night Lights >
        • Fan Lamp Class Extras
      • Stained Glass Seasonal Quilt Blocks
      • Stained Glass Desk Sets
      • Stained Glass Stars
      • "Blinders" David's SF Novel
    • Videos
    • Patterns
    • Greeting Cards
  • About Us
    • Instagram
    • Shows And Galleries
    • History Of Our Studio
    • Articles About Us
    • Links
    • Contact Us
  • Patreon
  • 5 Ways To Thrive
Picture

Glass Tips & Tricks 

Newsletters from our past converted to fresh articles about stained glass.
Picture

How To Solder For A Stained Glass Repair

In another article we showed how to repair this damaged panel, to see that article click here.
Picture
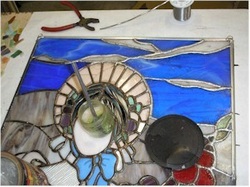
Now that our pieces are cut and foiled, we're ready to solder them into the window. But there's an obstacle, the glass doesn't sit as high up as the old glass, the solder edge on the other side is keeping the original window higher than the new pieces.

Picture
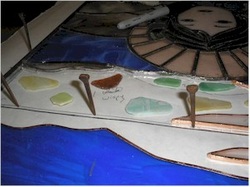
The fairly easy solution is to place little pieces of glass so that the repair pieces can rest on them. These pieces should run fairly thin so that the glass edges line up with each other. 

Picture
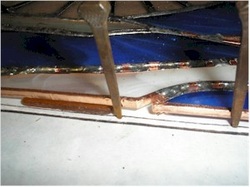
You can see that the first blue piece now lines up with the original window. The cloud piece has been left out so you can see the small glass pieces that it will rest on.

Picture
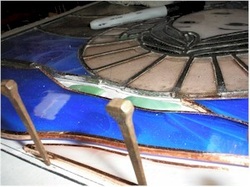
Now you can see the cloud is lined up, there's a "glass shim" ready for the next piece of blue glass. You can also see the new piece of foil that's been placed on the bonnet to replace one that was damaged when the old pieces were removed.

Picture
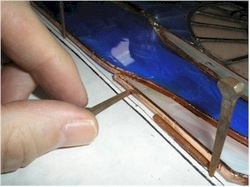
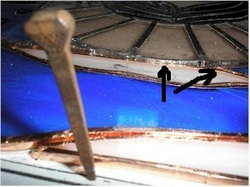
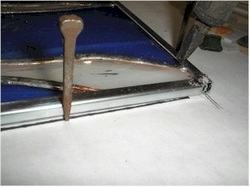
When an edge of the glass isn't up quite high enough  simply take a horseshoe nail and use it as a wedge to raise the glass up to the proper level by sliding it sideways under the piece until it rises to the proper level.

Picture
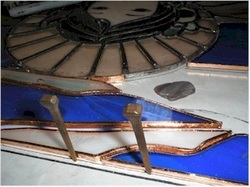
Apply flux and tack all the pieces so they won't move around.  


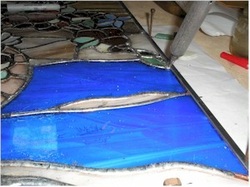
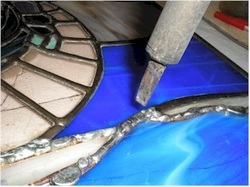
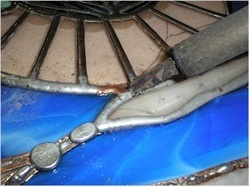
 Here, there was a bit of a gap so it gets filled by dragging the iron with some solder across the opening 90 degrees to the gap. This allows some solder to bridge the gap but doesn't get the joint hot enough for the solder to flow through to the other side of the window.

Leave some space between each bridge so that the solder has a chance to cool. This keeps the solder from getting hot enough to run all under the window.


Picture
This is more of a concern than when the window was originally soldered because when you first solder a panel, the first side has the glass sitting flat against the table and there's no place for solder to go and when you get to the second side the bottom has been sealed.  


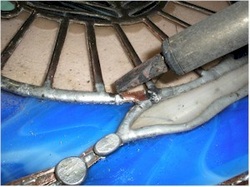
Here, the spaces between the "stitching" have been filled on the other side.


Picture
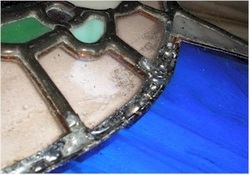
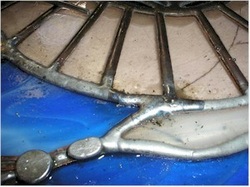
Once the gap has been bridged, you can finish the decorative soldering to make the top look nice. This is a place when turning down the temperature of the iron or cooling it frequently by rubbing it on a wet sponge keeps solder from getting too hot

Picture
Work your way up each side of the panel, connecting the lead lines to the new metal and solder the corners.

Picture
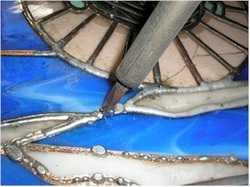
On the other side, you'll find many bulges of solder that tried to run through. By touching them and dragging them to the spots where they are needed, you may need very little extra solder on the back side of the panel.

Picture
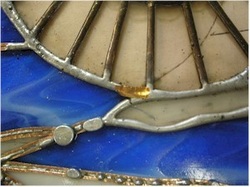
Here, a piece of new copper foil has been placed over a spot where there was a gap. To do this successfully, take a rag and wipe the area fairly clean. If you have a lot of flux on the glass it will be difficult to get the foil to stick.

Picture
Take a craft knife and trim the foil to the profile of where the lead needs to go. You may want to hold one end down with a finger as you pull against the foil with the knife.

Picture
With the foil trimmed to the correct shape, you can add flux and solder the foil in place.

Picture
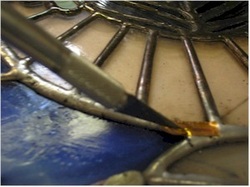
Touch the foil at one end, allow the solder to melt and once it sticks, pull off of the foil so you don't accidentally move it around.  


If the foil tries to move on you, use the craft knife to hold the foil in place as you solder.


Picture
You can then move to the opposite end of the foil and solder it. Let the solder below the foil melt and push the copper down using the iron tip until it is covered with solder. 


It may touch down to the glass below and that's good as long as you don't heat it up so much that it begins to run through to the other side.


Picture
Once the foil is covered and filled in, you may find a place that is slightly misshapen. Fix this by cleaning away the debris with a rag, reflux and touch the solder, melting it and then pull up to allow the metal to spring back into the shape gravity pulls it to.


If you still have an undesirable lump, try trimming back the line with the craft knife and re-melt.


Picture
Continue along fixing the lead lines, moving solder to where it needs to go by melting it, pulling it up with the iron and depositing it in another place.

Picture
Eventually, you'll find that the entire repair is complete and you'll wonder why it seemed like such a big deal to face a repair.

Picture
Here she is, after being cleaned, patina'd, waxed and polished. As good as new and impossible to tell that there was ever a repair done to it.

Home

​
Stained Glass Books
​

Stained Glass Videos

​Links Page

Stained Glass
Art Therapy

​Studio Classes

OnLine Classes

​Portfolio

​Etsy Patterns

​UCAB Sourcebook

Build Your Own Table

Tips & Articles

Patterns

​Contact Us

Art For Sale

​Free Videos

Creativity Quotes​

Date Night
​
​
History Of Our Studio

​Articles About Us

​Shows And Galleries

​Join Our Email List

5 Ways To Thrive
​​

Copyright © 2016-2017