

|
Glass Tips & TricksNewsletters from our past converted to fresh articles about stained glass.
|

|
Insulating Glass So It Can Be Hung In A Door
Tempered glass needs to surround decorative glass used in a door. This protects people from injury if the glass is broken and it also serves as a barrier against heat loss during cold months. Tempered glass must be ordered in advance and once its been tempered, it can't be cut or ground.

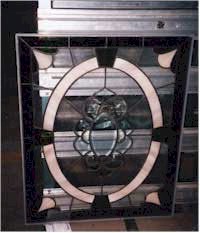
#1 Here the panel is lightly cleaned to get any dust off of it that may have collected after you take it to them. They only do a light cleaning, you are responsible for making sure that it is as clean as possible when you take it to them.

#2 Next, the tempered glass is sent through a machine which "super cleans" and dries it.
#3 The stained glass is next laid out on one sheet of the tempered glass. It is centered and there is a gap on each side and top and bottom of 5/16" (the size you subtracted from your finished size when building your panel).

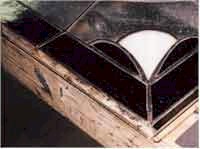
#4 Now, a sticky backed, foam tape with a metal skin is applied to the stained glass panel and the tempered glass below. It sticks to both pieces and holds them firmly.

#5 The metal tape is scored on each corner so it can be folded around the corner with a sharp clean edge. The tape can vary in width, this tape is 1/2", (we recommend 1/4" since the air gap will be less noticeable and the final width of the piece will be 1/2" total.

#6 Laying the second sheet on the foam tape requires help because they only get one chance to do it perfectly. Once the top sheet touches the tape, it's stuck. For this reason, you should always allow for an extra 1/8" in the finished opening of your door, in case the two sheets are slightly misaligned.
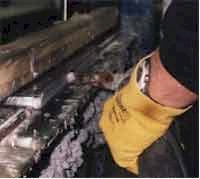
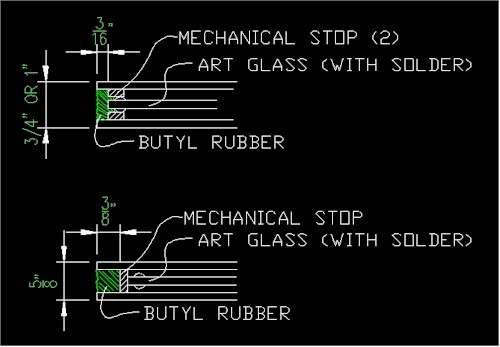
#7 Finally, the completed "sandwich" of glass is clamped in a table and hot butyl rubber is forced between the two sheets of tempered glass and filling the gap between the two. This covers the foam tape completely.
#8 Here, the completed window is ready for the customer to pick it up and to install it in their door.

|
|
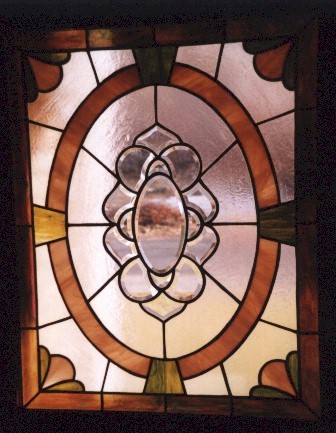
Finally, the completed panel is installed in the door and it looks great!
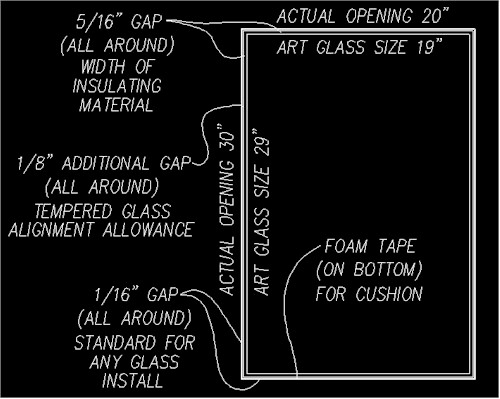
To correctly size a window, we recommend the following:
The decorative panel should be sized 1" smaller than the actual opening in the door. This allows there to be enough space for foam tape in the bottom of the opening to support the window and for silicone in the sides and top to hold the panel securely. The tempered glass (ordered in advance from the glass company) should be 1/8" smaller than the actual opening on each side or 1/4" smaller in total.
The window trim must be 1/2" or greater on each side. This will allow any slight gaps between the foam tape used when applying tempered glass to the decorative panel to be covered by the trim.
The drawing below shows the exact measurements that our local glass friends tell us to build panels to. You should check with the glass shop you'll be working with to see what their sizing recommendations are.
Stained glass artists often choose to have their glass encased in between two pieces of tempered glass and sealed with Butyl rubber. This forms an insulated unit which surpasses minimum building codes and is easy to clean by janitorial crews when glass is installed in a commercial setting.
At Gomm Stained Glass, we choose to have our friends at another stained glass studio do our insulated glass for us for two reasons. First, they know how to handle stained glass and so they treat it like they would their own. Second, we could do the work ourselves, but we wouldn't be as good as them because they do at least a hundred units a month and we wouldn't do that many, so they are always in better practice than we would be. I am now in the habit of calling them when I have an insulated unit to build an verifying what size I should build my art glass for the project. So far, we've never missed on the sizes!
At Gomm Stained Glass, we choose to have our friends at another stained glass studio do our insulated glass for us for two reasons. First, they know how to handle stained glass and so they treat it like they would their own. Second, we could do the work ourselves, but we wouldn't be as good as them because they do at least a hundred units a month and we wouldn't do that many, so they are always in better practice than we would be. I am now in the habit of calling them when I have an insulated unit to build an verifying what size I should build my art glass for the project. So far, we've never missed on the sizes!