Gomm Studios   (385) 392-7989
Gomm Stained Glass
  • Home
    • Fun Quiz Page
  • Projects
  • Classes
    • Learn More About Studio Classes
  • STORE
    • Art 4 Sale
    • Amazon Shop >
      • Store-Books
      • Store-Videos
      • Store-MiscProductsWeUse
      • Store-VideoandAudio
      • Store-StainedGlassSupplies
    • Etsy
    • Tips Articles >
      • Fixing Windows >
        • Repairing Severe Damage
        • Repairing A Broken Piece Of Glass
        • Fixing A Small Break In A Big Piece Of Glass
        • Faking A Repair
        • Doing A MAJOR Repair
        • How To Repair A Leaded Panel
        • How To Repair Stained Glass That Has Separated
        • How To Rebuild A Leaded Glass Window W/ Copper Foil
        • How To Repair A Moderately Broken Art Glass Panel
        • How To Repair An Insulated Stained Glass Window
        • Changing the Border Glass In a Leaded Panel
        • Repairing A Stained Glass Panel For An Artist
        • Repair Using A Dremel Tool
        • Quick(er) Lead Repair
      • Tricks Of The Trade >
        • Insulating Glass So It Can Be Hung In A Door
        • Moving And Handling Glass
        • Cutting Diamonds On Very Rough Glass
        • How To Add Coining To A Panel For A Very "French" Look
        • How To Shorten A Stained Glass Panel
        • How To Trim And Cut A Stained Glass Panel That's Too Long
        • How To Build A Jig To Help Cut Bevels
        • How To Cut Stained Glass Without A Pattern
      • Reinforcing and Framing Glass >
        • Reinforcing A Large Panel
        • How To Aggressively Reinforce A Window
        • Soldering A Zinc Edge On A Panel
        • How To Solder A Reinforcing Edge On A Curved Panel
        • How To Put Metal Around An Octagon Shaped Panel
        • Building A Frame For Stained Glass Shutters
      • Shipping Stained Glass >
        • How To Ship Big Stained Glass Panels
        • How To Build A Solid Shipping Crate
        • How We Crate Same Size Multiples of Glass
        • How To Build A "Double Foam" Crate
        • Loading Glass On A Trailer
      • Lighting Projects >
        • Installing Art Glass In A Pool Table Lamp
        • How To Build A Panel For A Backlit Space
        • How To Reinforce A Stained Glass Skylight
        • Creating A False Skylight
        • Building A Four Sided Lamp
        • Repair A Cheap Lamp Shade
        • Building A Stained Glass Lamp With A Worden Mold
      • Installing Stained Glass >
        • How To Install Stained Glass in an Existing Window Frame
        • How To Install Stained Glass In A Cabinet Door
        • How To Hang A Stained Glass Window
        • How We Install A Panel In An Arched Window Opening
        • What Ttype Of Caulk To Use
      • Sandblasting Stained Glass >
        • How To Sandblast Stained Glass
        • How We Sand Carve A Stained Glass Transom
        • Setting Up A Sandblast System
        • How To Sand Carve A Rose In Glass
      • Organizing Your Studio >
        • Build Your Own Work Bench
        • Chemicals We Use In Our Studio
        • Getting A New Glass Order
        • Build Your Own Stained Glass Rack
        • Converting To A Lead Free Studio
      • Bring New Life To Windows >
        • Removing Corrosion From Stained Glass
        • Re-Apply Patina To Stained Glass
        • How To Clean A Really Dirty Window
        • Clean And Apply Patina To Stained Glass
        • Cleaning And Adding Patina To A New Stained Glass Panel (revisited)
        • Easily Clean Corrosion Off Of Stained Glass
      • Unusual Projects >
        • Building A Stained Glass Globe
        • The Painted Leaf Project
        • How To Paint A Face On Stained Glass
        • Fusing A Stained Glass Necklace
        • Building A Stained Glass Picture Frame
        • Building A Stained Glass Jewelry Box
        • Make Stained Glass Charms
        • Repairing A Stained Glass Angel By Making Our Own Glass
      • Soldering Techniques >
        • Fix or Reinforce Glass With A Solder Bridge
        • How To Solder For A Stained Glass Repair
        • Reclaiming Old Flux Core Solder For Use In Stained Glass
        • Soldering Technique-Fixing A Foil Problem
      • Basic Skills >
        • How To Cut Stained Glass
        • How To Cut Stained Glass with a T-square Cutter
        • How To Cut A Tight Curve In Stained Glass
        • Cutting Very Thin, Irregular Stained Glass Pieces
        • Cut Glass Using A Straight Edge
      • Advanced Craftsmanship Skills >
        • Cut Glass Using A Taurus Ring Saw
        • Drill Holes In Stained Glass With Diamond Drillbit
        • Drill Holes In Stained Glass With A Grinder
      • Business Tips >
        • Marketing Stained Glass
        • Helping Your Stained Glass Business (And Yourself) Survive With Style
        • Mistakes Happen To Us All (And Then We Fix Them)
        • Converting To A Lead Free Studio
    • Training Videos & Books >
      • Gomm Studios Portfolio 1
      • Stained Glass Mandalas For Meditation
      • Stained Glass Mandalas For Success
      • Beginning Stained Glass
      • Stars, Stars and More Stars
      • How To Install Stained Glass
      • Stained Glass Picture Frame
      • Stained Glass Jewelry Box
      • Stained Glass Kaleidoscope
      • Stained Glass Charms
      • Stained Glass Projects For The Whole Family
      • Stained Glass Fan Lamps and Night Lights >
        • Fan Lamp Class Extras
      • Stained Glass Seasonal Quilt Blocks
      • Stained Glass Desk Sets
      • Stained Glass Stars
      • "Blinders" David's SF Novel
    • Videos
    • Patterns
    • Greeting Cards
  • About Us
    • Instagram
    • Shows And Galleries
    • History Of Our Studio
    • Articles About Us
    • Links
    • Contact Us
  • Patreon
  • 5 Ways To Thrive
Picture

Glass Tips & Tricks 

Newsletters from our past converted to fresh articles about stained glass.
Picture

How To Ship Big Stained Glass Panels

To ship a big piece of glass, it needs to be crated. We build a crate around every big piece of glass which we ship. It needs to be a custom fit so that the glass can be adequately protected. The following pictures are of us building a crate for a 3' by 5' window. We use similar techniques when crating smaller windows.
Picture
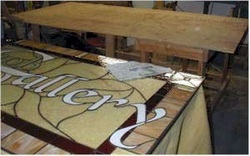
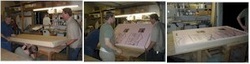
We have the stained glass panel laid out on a different table than the one we're going to build the crate on.

Picture
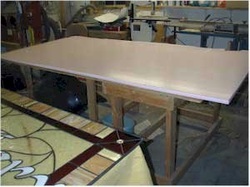
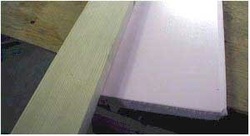
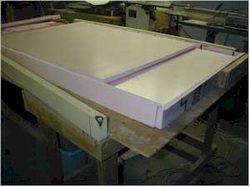
First we lay the 1" thick rigid foam insulation on the table. This comes in pink or blue depending on the brand you buy.

Picture
We lay the panel to be shipped on top of the insulation and use a box knife to cut around the panel. We cut right on the edge. We don't want any extra foam hanging beyond the window edge.

Picture
Then we slide the cut line of the foam over the edge of the table and push down to break the foam. If it has a membrane holding it together, we run a utility knife along it to cut it off. We use the cut off pieces as a template to cut the second piece of foam the same size as the first.

Picture
Then we take a two by four and use it as a pattern to cut four pieces of  filler pieces of foam.

Picture
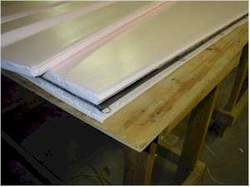
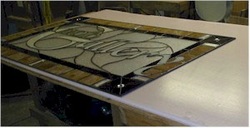
Here we have the "foam, glass, foam sandwich," with some of our cut pieces laying on top.

Picture
Next we take the long pieces and cut them to the length of the sign and set one on each side of the sign. Then we stand up a two by four along the long edge and mark a cut line a two by four width from the end of the sign. 

Picture
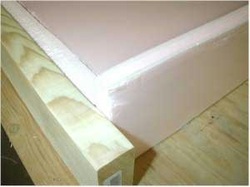
(We make sure that the other end of the two by four is hanging out a two by four width at the other end when marking) The cut two by four is then cut a saw blade width short so the box will keep the foam tight. We cut a second one for the other side.

Picture
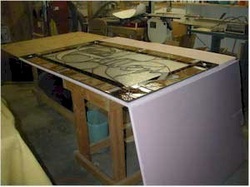
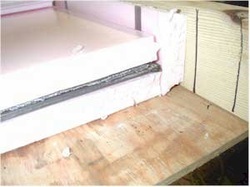
Here is the foam "sandwich" with another piece of scrap foam on top of the pile to raise the top of the entire package to the height of the two by four frame. You can also see the two by four side piece ready to be put in place.

Picture
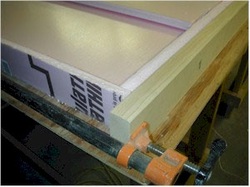
Now we use a clamp to pull the two by fours together on each end. We only apply a slight amount of pressure to the clamp. We want the crate to be tight but not so tight we damage the foam and drive it into the stained glass we're protecting.

Picture
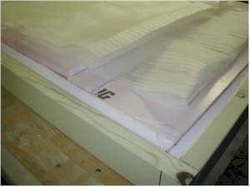
We cut and attach our connecting two by fours. Then we check that the top of the crate is even with the two by four framework. Then we add a couple of layers of foam blanket to the top so that the lid of the crate will apply a slight amount of pressure when it's in place.

Picture
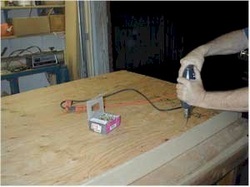
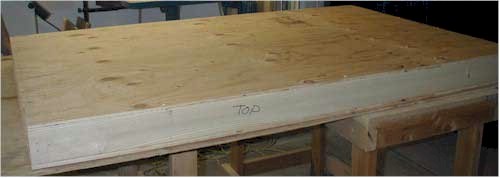
Because we have an inch of foam on the top and bottom and all around the glass inside the crate, it is safe to screw down the plywood top of the crate. We laid the plywood on top of the framework and traced around it and then cut it out.

Picture
Next we got some friends to help flip the whole assembly over.

Picture
Then we laid the final piece of plywood down and screwed it in place.

Picture
When we ship, we find that moving van lines have a good system in place to haul sensitive and delicate items, such as electronics and stained glass. They cost 3 or 4 times more than common carrier, but you get what you pay for.
***Update***

Nowadays, we use the white Styrofoam sheets of insulation that can be obtained from home improvement centers. It has more "give" to it. Also, once the package of glass and insulation is completed, we add an additional layer of insulation all around the package. This insures that we have at least 2" of foam around the glass (which the shipping companies require).

See instructions for extra foam crate.


We frequently use the techniques described in another article: How to build a multi-crate.


 There's also a video on YouTube about building a glass crate, his techniques are fairly good, make sure and build yours so you can fit 2" of foam all around your glass.

Home

​
Stained Glass Books
​

Stained Glass Videos

​Links Page

Stained Glass
Art Therapy

​Studio Classes

OnLine Classes

​Portfolio

​Etsy Patterns

​UCAB Sourcebook

Build Your Own Table

Tips & Articles

Patterns

​Contact Us

Art For Sale

​Free Videos

Creativity Quotes​

Date Night
​
​
History Of Our Studio

​Articles About Us

​Shows And Galleries

​Join Our Email List

5 Ways To Thrive
​​

Copyright © 2016-2017