Gomm Studios   (385) 392-7989
Gomm Stained Glass
  • Home
  • Projects
  • Classes
    • Learn More About Studio Classes
  • STORE & RESOURCES
    • Art 4 Sale
    • Amazon Shop
    • Etsy
    • Tips Articles >
      • Fixing Windows >
        • Repairing Severe Damage
        • Repairing A Broken Piece Of Glass
        • Fixing A Small Break In A Big Piece Of Glass
        • Faking A Repair
        • Doing A MAJOR Repair
        • How To Repair A Leaded Panel
        • How To Repair Stained Glass That Has Separated
        • How To Rebuild A Leaded Glass Window W/ Copper Foil
        • How To Repair A Moderately Broken Art Glass Panel
        • How To Repair An Insulated Stained Glass Window
        • Changing the Border Glass In a Leaded Panel
        • Repairing A Stained Glass Panel For An Artist
        • Repair Using A Dremel Tool
        • Quick(er) Lead Repair
      • Tricks Of The Trade >
        • Insulating Glass So It Can Be Hung In A Door
        • Moving And Handling Glass
        • Cutting Diamonds On Very Rough Glass
        • How To Add Coining To A Panel For A Very "French" Look
        • How To Shorten A Stained Glass Panel
        • How To Trim And Cut A Stained Glass Panel That's Too Long
        • How To Build A Jig To Help Cut Bevels
        • How To Cut Stained Glass Without A Pattern
      • Reinforcing and Framing Glass >
        • Reinforcing A Large Panel
        • How To Aggressively Reinforce A Window
        • Soldering A Zinc Edge On A Panel
        • How To Solder A Reinforcing Edge On A Curved Panel
        • How To Put Metal Around An Octagon Shaped Panel
        • Building A Frame For Stained Glass Shutters
      • Shipping Stained Glass >
        • How To Ship Big Stained Glass Panels
        • How To Build A Solid Shipping Crate
        • How We Crate Same Size Multiples of Glass
        • How To Build A "Double Foam" Crate
        • Loading Glass On A Trailer
      • Lighting Projects >
        • Installing Art Glass In A Pool Table Lamp
        • How To Build A Panel For A Backlit Space
        • How To Reinforce A Stained Glass Skylight
        • Creating A False Skylight
        • Building A Four Sided Lamp
        • Repair A Cheap Lamp Shade
        • Building A Stained Glass Lamp With A Worden Mold
      • Installing Stained Glass >
        • How To Install Stained Glass in an Existing Window Frame
        • How To Install Stained Glass In A Cabinet Door
        • How To Hang A Stained Glass Window
        • How We Install A Panel In An Arched Window Opening
        • What Ttype Of Caulk To Use
      • Sandblasting Stained Glass >
        • How To Sandblast Stained Glass
        • How We Sand Carve A Stained Glass Transom
        • Setting Up A Sandblast System
        • How To Sand Carve A Rose In Glass
      • Organizing Your Studio >
        • Build Your Own Work Bench
        • Chemicals We Use In Our Studio
        • Getting A New Glass Order
        • Build Your Own Stained Glass Rack
        • Converting To A Lead Free Studio
      • Bring New Life To Windows >
        • Removing Corrosion From Stained Glass
        • Re-Apply Patina To Stained Glass
        • How To Clean A Really Dirty Window
        • Clean And Apply Patina To Stained Glass
        • Cleaning And Adding Patina To A New Stained Glass Panel (revisited)
        • Easily Clean Corrosion Off Of Stained Glass
      • Unusual Projects >
        • Building A Stained Glass Globe
        • The Painted Leaf Project
        • How To Paint A Face On Stained Glass
        • Fusing A Stained Glass Necklace
        • Building A Stained Glass Picture Frame
        • Building A Stained Glass Jewelry Box
        • Make Stained Glass Charms
        • Repairing A Stained Glass Angel By Making Our Own Glass
      • Soldering Techniques >
        • Fix or Reinforce Glass With A Solder Bridge
        • How To Solder For A Stained Glass Repair
        • Reclaiming Old Flux Core Solder For Use In Stained Glass
        • Soldering Technique-Fixing A Foil Problem
      • Basic Skills >
        • How To Cut Stained Glass
        • How To Cut Stained Glass with a T-square Cutter
        • How To Cut A Tight Curve In Stained Glass
        • Cutting Very Thin, Irregular Stained Glass Pieces
        • Cut Glass Using A Straight Edge
      • Advanced Craftsmanship Skills >
        • Cut Glass Using A Taurus Ring Saw
        • Drill Holes In Stained Glass With Diamond Drillbit
        • Drill Holes In Stained Glass With A Grinder
      • Business Tips >
        • Marketing Stained Glass
        • Helping Your Stained Glass Business (And Yourself) Survive With Style
        • Mistakes Happen To Us All (And Then We Fix Them)
        • Converting To A Lead Free Studio
    • YouTube Videos
    • Free Patterns
  • About Us
    • Instagram
    • Shows And Galleries
    • History Of Our Studio
    • Articles About Us
    • Links
    • Contact Us
Picture

Glass Tips & Tricks 

Newsletters from our past converted to fresh articles about stained glass.
Picture

How We Crate Same Size Multiples of Glass

There is a time when we need to ship several panels and a little more weight in one crate costs a lot less than shipping several different crates.
Picture
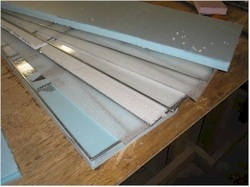
Here are three windows stacked up with 1" rigid foam on the top and bottom and thin bubble foam between each layer of glass.

Picture
As the panels are stacked up, new foam and sheeting are cut to size.

Picture
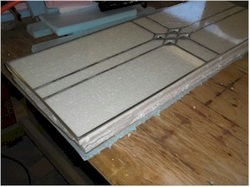
The foam and glass stack form a nice, neat stack.

Picture
The foam stack is completed with a rigid foam outer shell which is duct taped together to keep the foam in place. 


(There is 1" of foam between each panel of glass and 2-1" pieces on the top and bottom and surrounding the edges of the glass).

Picture
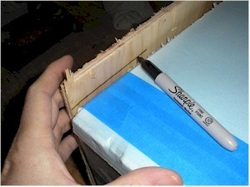
Then we place plywood up against the foam stack and mark it to cut it.

Picture
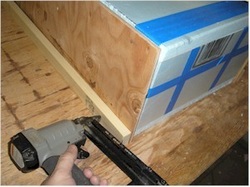
1" sticks are stapled and glued to the wood to provide something to attach other panels to.

Picture
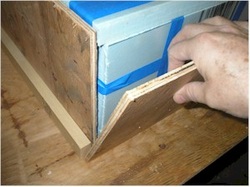
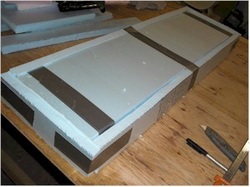
End panels are fitted to each end of the crate.

Picture
The end panels are nailed to the 1" sticks that were stapled to the side panels.

Picture
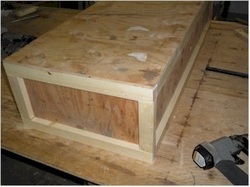
The top and bottom panels are cut to fit the crate.

Picture
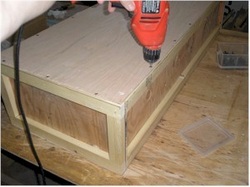
The top is screwed on so that the crate can be easily opened.

Picture
We sand the wood to get rid of all sharp edges.

Picture
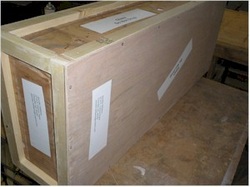
We glue many extra labels to the crate.

This type of crate is very light weight and is strong enough to protect the glass

We recently shipped a panel in the foam package without plywood and in a cardboard box supplied by UPS. The two panels arrived with cracks which we'll have to repair. The moral: stronger make sure the box you ship in is over-sized and that the fill it wit foam peanuts.


***Update***

Nowadays, we use the white Styrofoam sheets of insulation that can be obtained from home improvement centers. It has more "give" to it. Also, once the package of glass and insulation is completed, we add an additional layer of insulation all around the package. This insures that we have at least 2" of foam around the glass (which the shipping companies require).

See instructions for extra foam crate.


Home

​
Stained Glass Books
​

Stained Glass Videos

​Links Page

Stained Glass
Art Therapy

​Studio Classes

OnLine Classes

​Portfolio

​Etsy Patterns

​UCAB Sourcebook

Build Your Own Table

Kaleidoscope


Tips & Articles

Patterns
Mosaic Patterns

​Contact Us

Art For Sale

​Free Videos

Creativity Quotes
​

Date Night
​
​
History Of Our Studio

​Articles About Us

​Shows And Galleries

​Join Our Email List

5 Ways To Thrive
​​

Copyright © 2016-2025